what does the upper radiator hose connect to bmw e60
The following article provides detailed instructions on replacing the radiator in a BMW E46 iii series car. Even though we have used a 2003 BMW 325ci to perform this installation, this article can exist applied to any E46 three series vehicle, including the 323i, 328i and 330i coupe, sedan and convertible.
As the old Benjamin Franklin saying goes, "...in this world, nil is sure except death and taxes". If you are a BMW E46 owner, you would probably hold with one more certainty that could be added to that proverb; a leaking radiator. It'southward not a thing of "if" your BMW E46 radiator is going to leak...information technology is a matter of "when". And hopefully, that "when" is safely in your garage and non on a long road trip far from home.
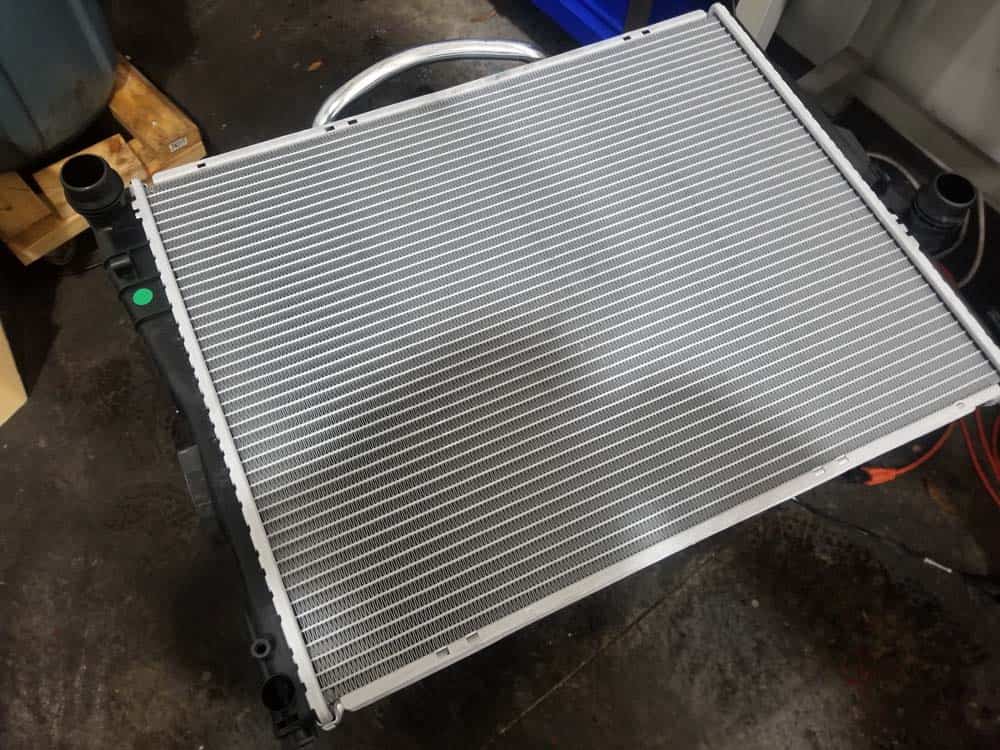
The BMW E46 radiator is a unproblematic estrus exchanger; hot engine coolant flows into the aluminum core of the radiator and is cooled by outside air being diddled across it. This transfer of heat is accomplished by cooling fins that are attached to an internal network of tubing.
Like the rest of the parts that incorporate the vehicle'due south engine cooling arrangement, the radiator is under constant strain from oestrus and pressure level. The BMW E46 radiator is really synthetic of two plastic coolant tanks joined to an aluminum core. As the plastic ages, information technology tin can class stress cracks, particularly around the coolant hose fittings. The connections betwixt aluminum and plastic are likewise common sources of coolant leakage.
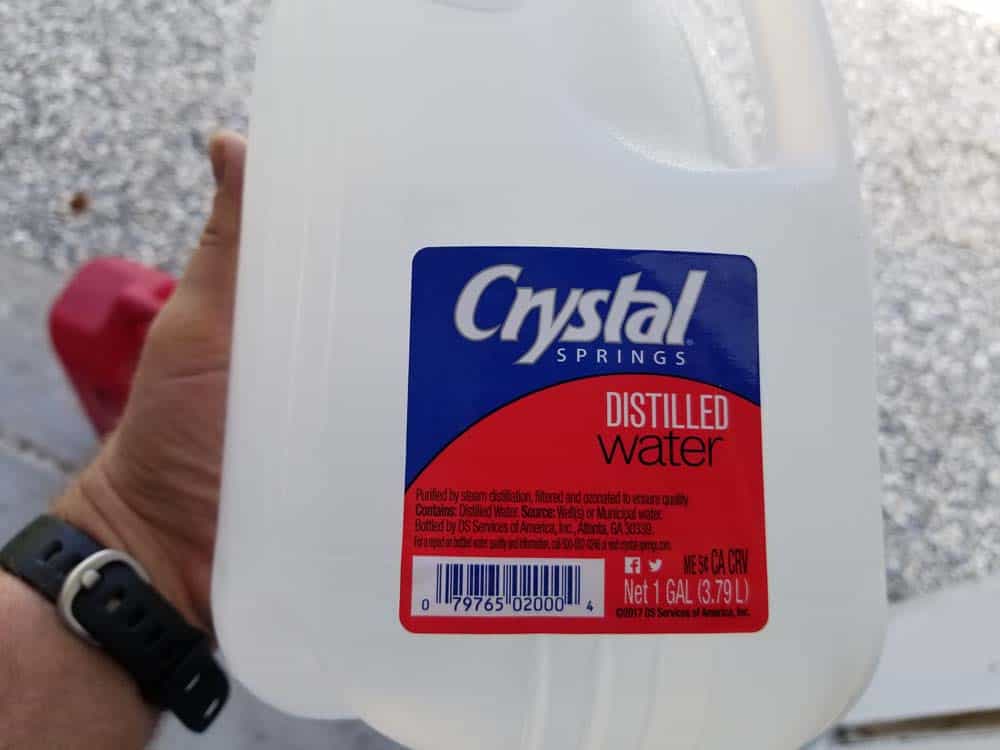
An older BMW E46 radiator can also start to deteriorate from within. Corrosion, dirt and debris tin can build up within the internal tubing lessening the radiator'southward ability to cool the engine. Deposits from high mineral content water can impede fluid circulation inside the core, causing devastating damage to the radiator. Internal mineral deposits in your radiator tin exist avoided by only using distilled water when mixing your engine coolant.
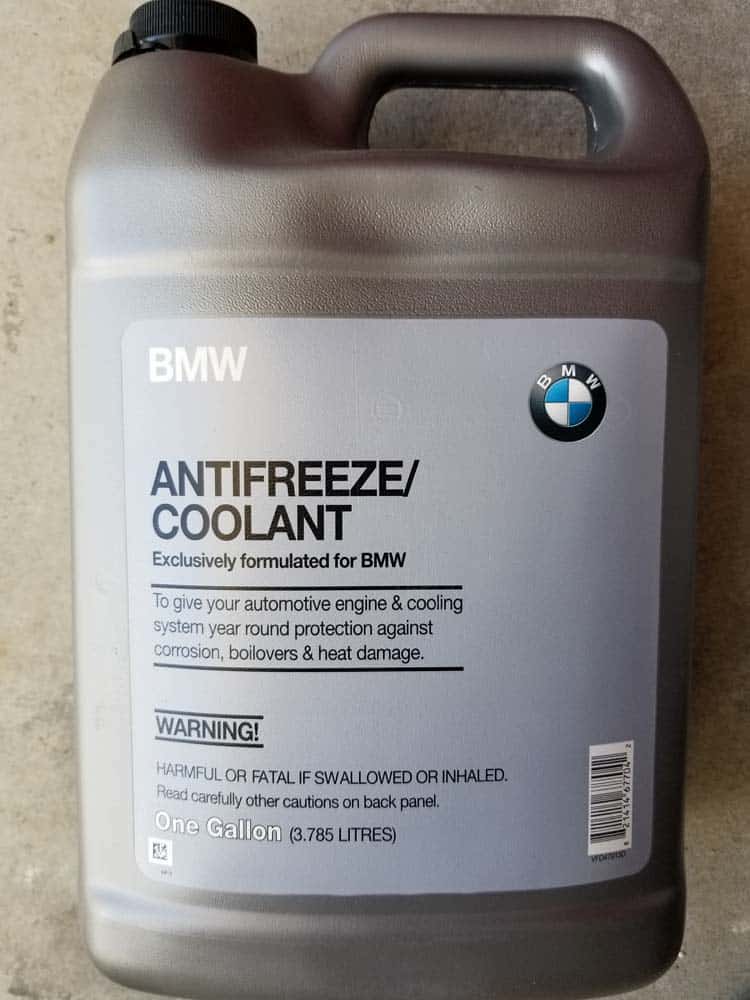
Replacing the radiator in a BMW E46 iii series is a straightforward process for the boilerplate habitation mechanic. It is very important to but use Genuine BMW Antifreeze/Coolant mixed 50/50 with distilled water when refilling your organization at the end of this repair.

×
E46 3 Series - All Models
| BMW | E46 | 323Ci | M52 two.5L |
| BMW | E46 | 323i | M52 2.5L |
| BMW | E46 | 325Ci | M54 2.5L |
| BMW | E46 | 325i | M54 two.5L |
| BMW | E46 | 325xi | M54 2.5L |
| BMW | E46 | 328Ci | M52 2.8L |
| BMW | E46 | 328i | M52 2.8L |
| BMW | E46 | 330Ci | M54 3.0L |
| BMW | E46 | 330i | M54 3.0L |
| BMW | E46 | 330xi | M54 3.0L |
| BMW | E46 | M3 | S54 3.2L |


Includes detailed role diagrams, role numbers and links to purchase all of the required components needed to complete this repair.

Before starting this repair, you lot must have the following required parts.
All E46 models except M3 - For vehicles with automatic transmission simply
This is the same factory radiator that would be installed at the BMW dealership.
All E46 models except M3 - For vehicles with transmission transmission only and production date from 05/2005
This is the same manufacturing plant radiator that would be installed at the BMW dealership.
All E46 models except M3 - For vehicles with manual transmission just and product date from 05/2005
Continue your engine properly cooled with this 18-carat radiator replacement.
Fits all BMW vehicles
This is the same Genuine BMW coolant yous would buy from the dealership.
All BMW E46 models
This is the aforementioned factory radiator hose that would be installed at the BMW dealership.
All BMW E46 models
Over the years and with exposure to extremely hot coolant, the coolant hoses in your vehicle can take a chirapsia. Being made of reinforced condom, these hoses can fail in a number of ways. Splitting at a hose clamp, swelling, cracking, and breaking are just a few of the means this hose can leave y'all stranded. Supervene upon it at the first sign of wear to keep your coolant in your engine.
Department i - Draining the Radiator and Removing the Lower Radiator Hoses
Removing the old radiator from your BMW E46 is a straightforward procedure. Unfortunately, the nigh difficult office of the repair is removing the coolant hoses, specially the lower ones which must be washed from under the machine. The hoses fit tight on their fittings and ofttimes must be pried off. Age and heat complicate things since the internal hose o-rings will get stuck on the plastic radiator fittings. If you are non planning on replacing your coolant hoses during this repair, care should be taken during the removal process so every bit not to damage them.
- Jack and support the front of the car. Not sure how to jack and back up your E46? Run across our article BMW Jacking and Supporting for Repairs and Maintenance.
- If the belly pan (aka – skid plate or lower engine cover) is still installed on your vehicle, remove it using an 8mm nut driver. Belly pans tend to disappear on older BMWs – they take a lot of abuse and are one of those parts that owners just don't spend money on replacing. The belly pan needs to be removed in guild to access the bottom of the radiator.
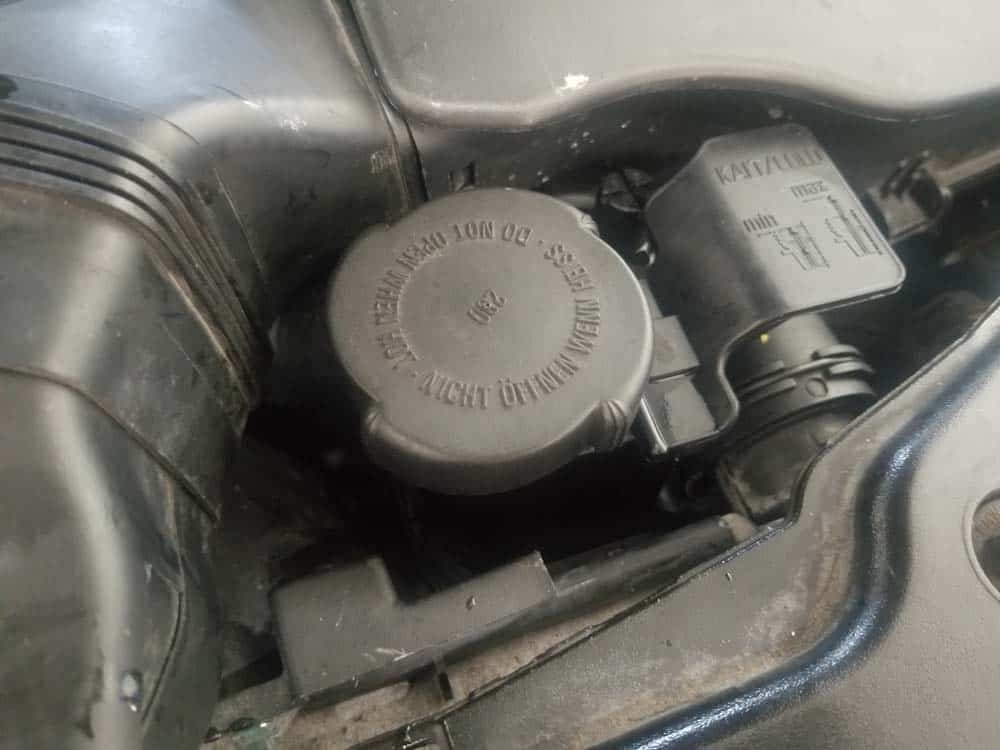
- Remove the cap from the coolant expansion tank. This will allow the organization to drain thoroughly.
- Locate the radiator under the front of the vehicle. The drain plug is located on the left side of the radiator.
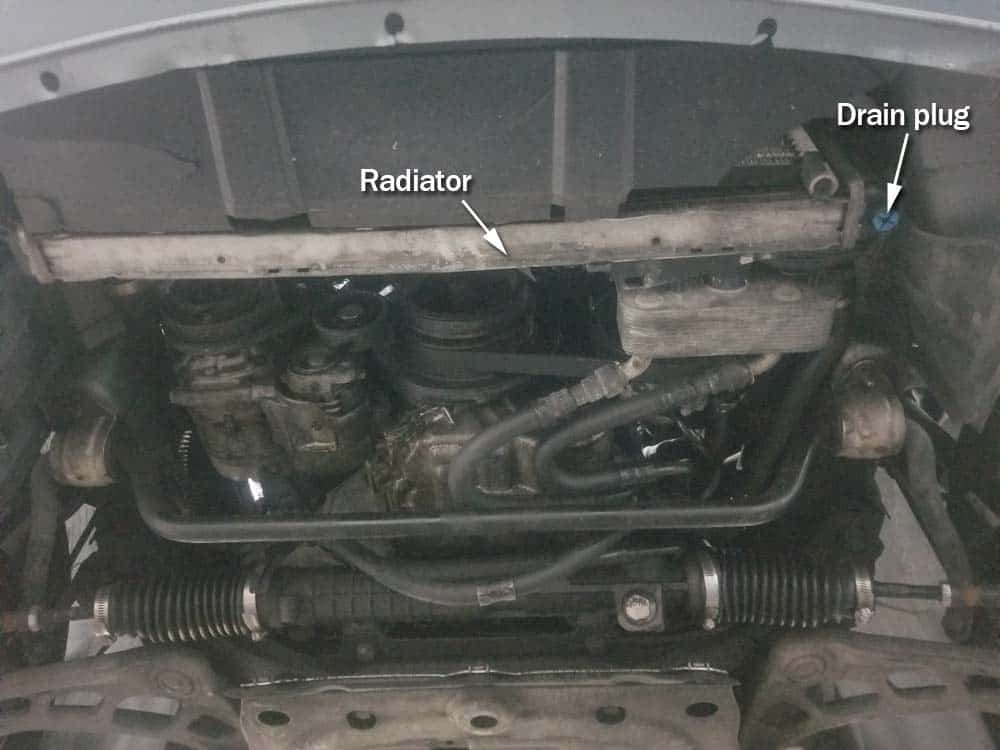
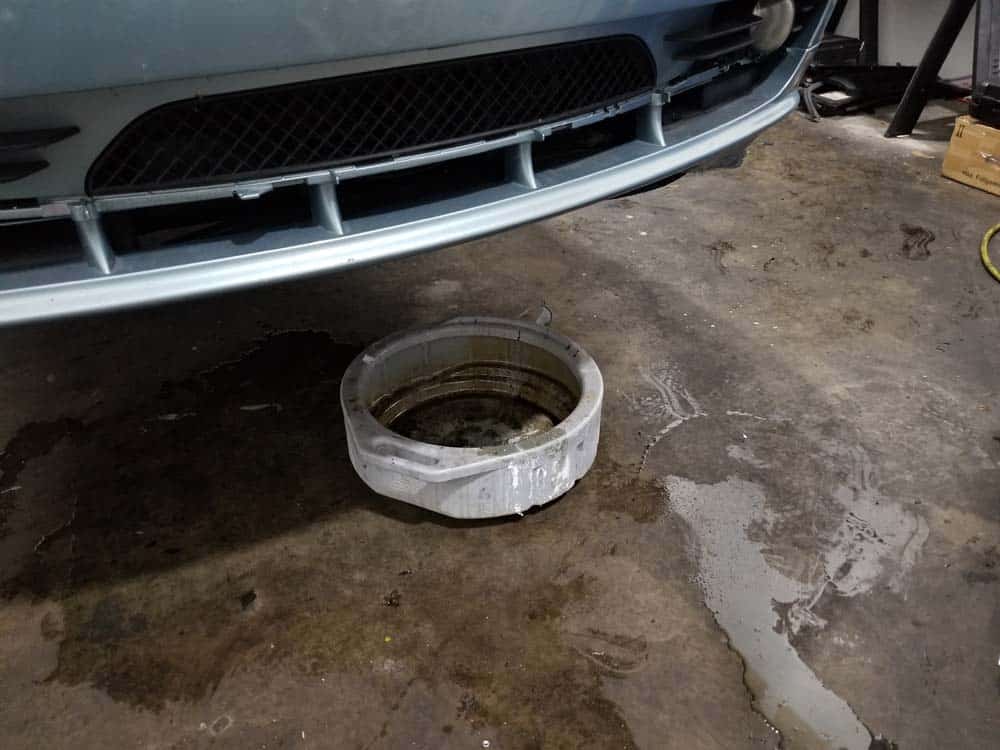
- Position a 5 gallon drain pan nether the bleed plug.
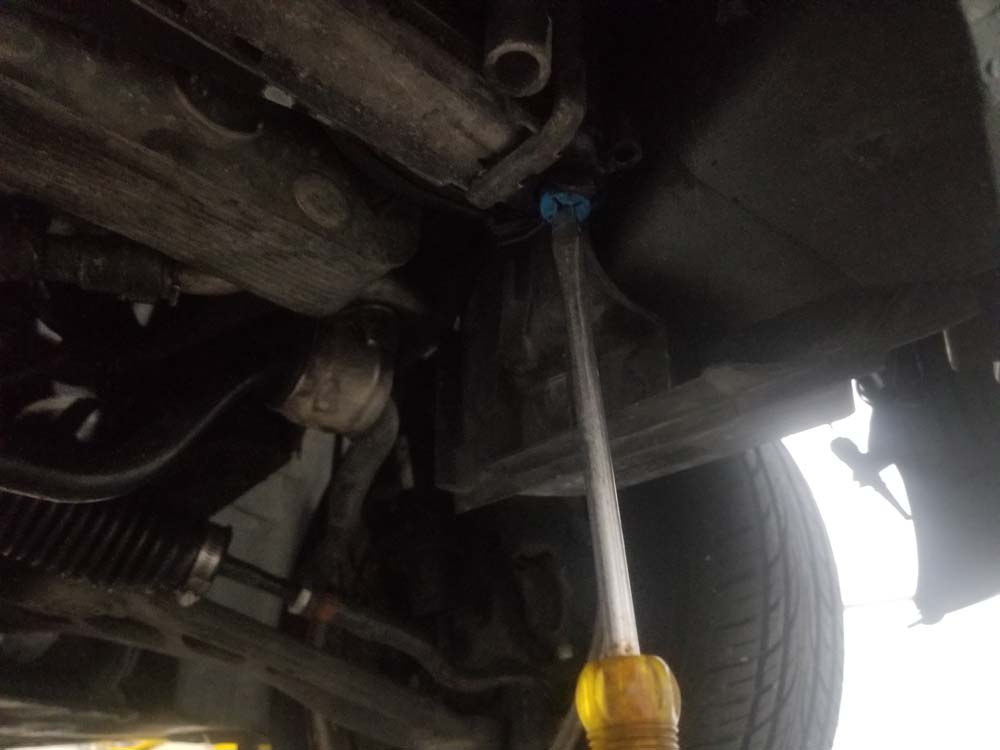
- Using a big apartment blade screwdriver, remove the radiator bleed plug. Let the coolant to completely bleed from the radiator. When information technology is finished, replace the drain plug to keep coolant from spilling on the footing while removing the radiator from the car.
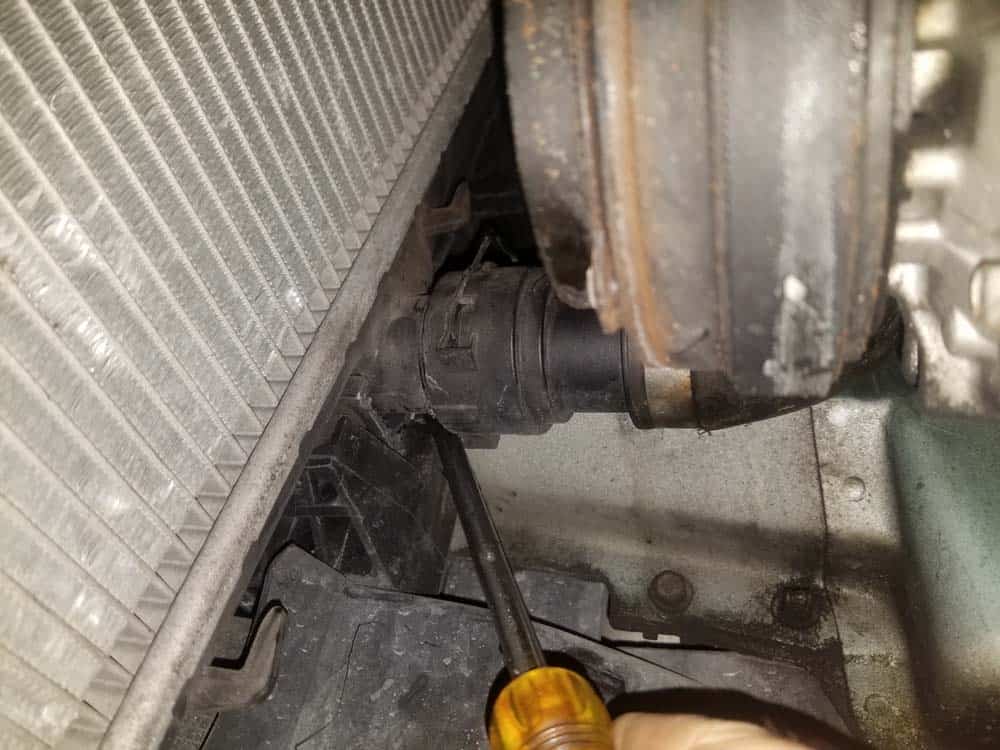
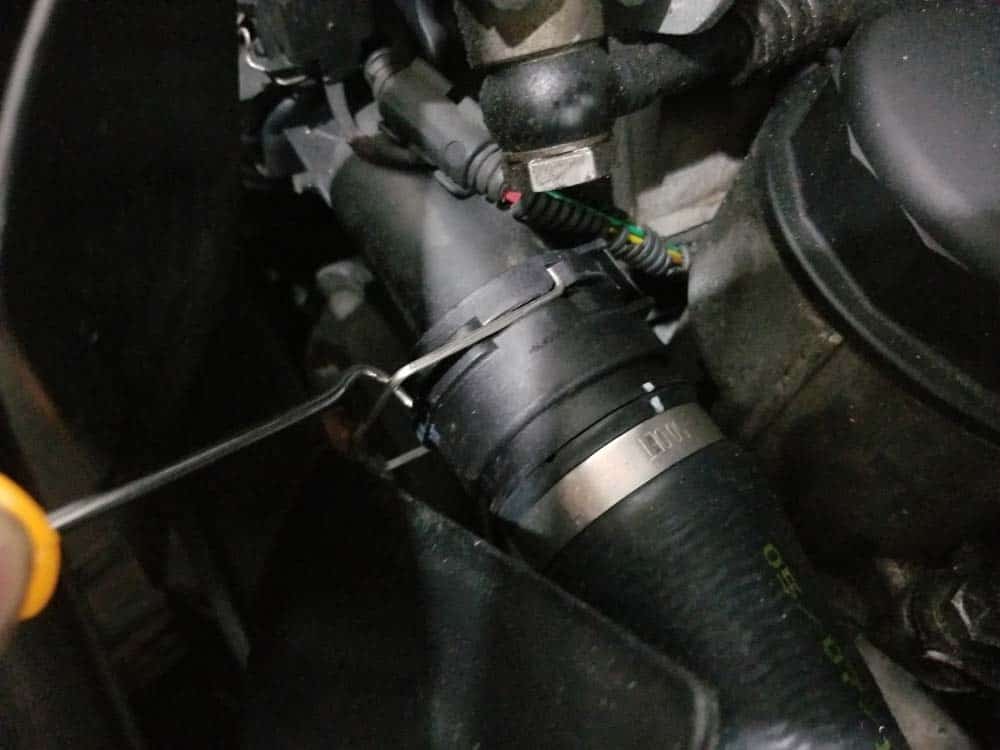
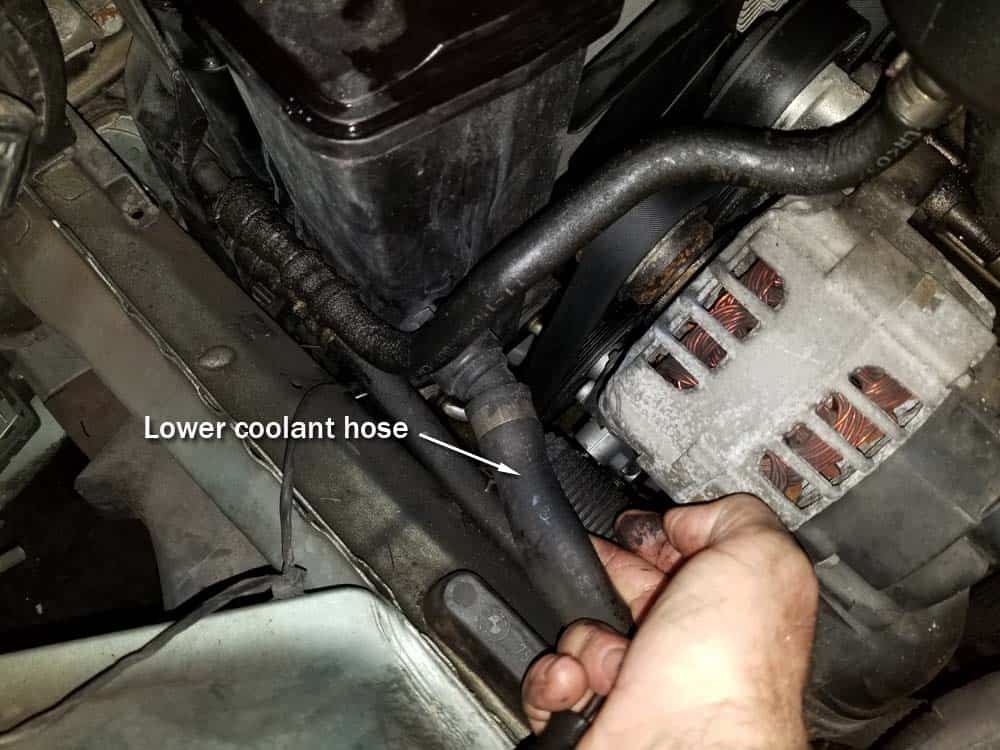
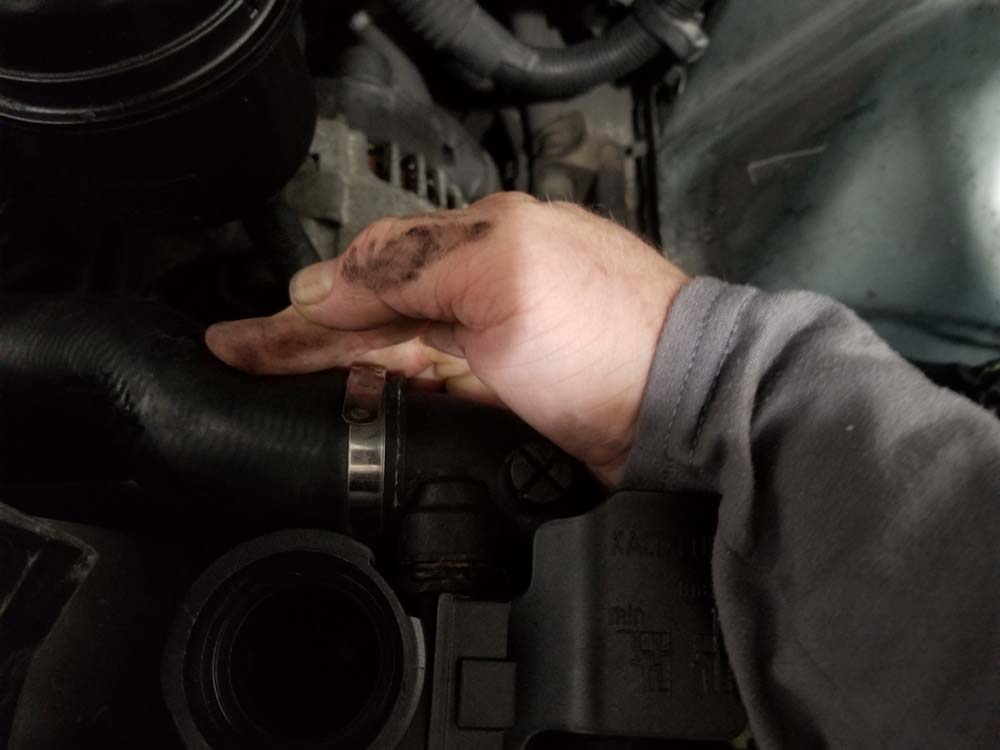
- Moving to the correct side of the radiator, use a metal pick or apartment bract screwdriver to release the metal clench that locks the lower right radiator coolant hose to its fitting.
- Position the five gallon pan nether the hose. Grasp the hose and pull information technology loose from the radiator. This hose can oftentimes be very stubborn. Try rocking information technology dorsum and along while pulling on it until information technology releases from the plumbing equipment. If this doesn't work, endeavor using a large flat bract screwdriver to gently pry it off of the radiator.

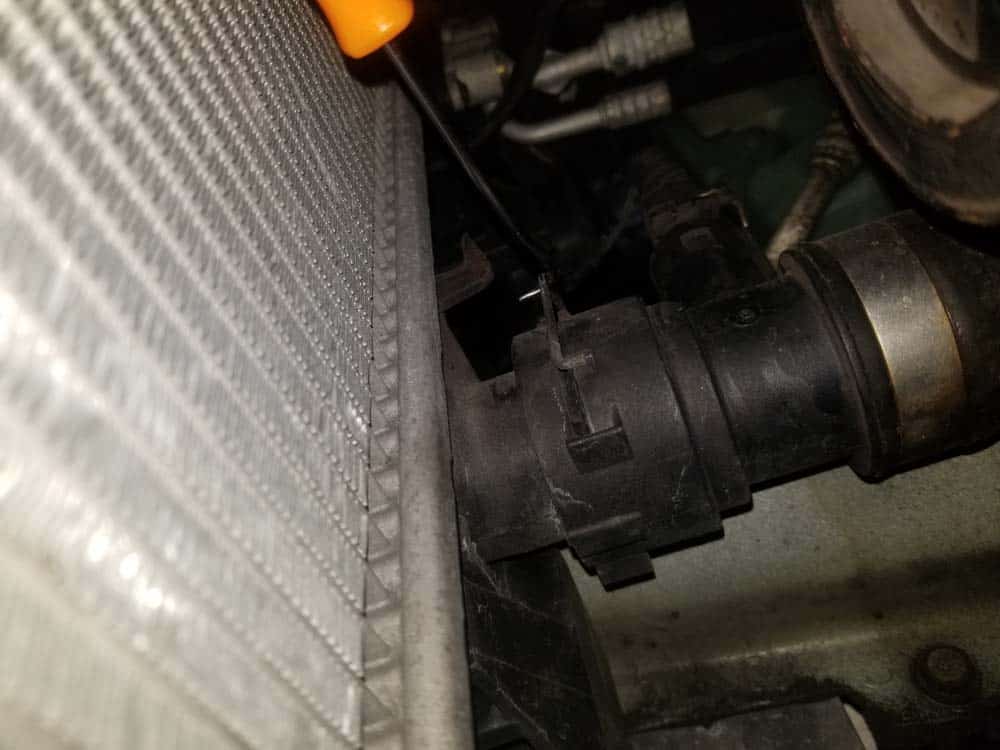
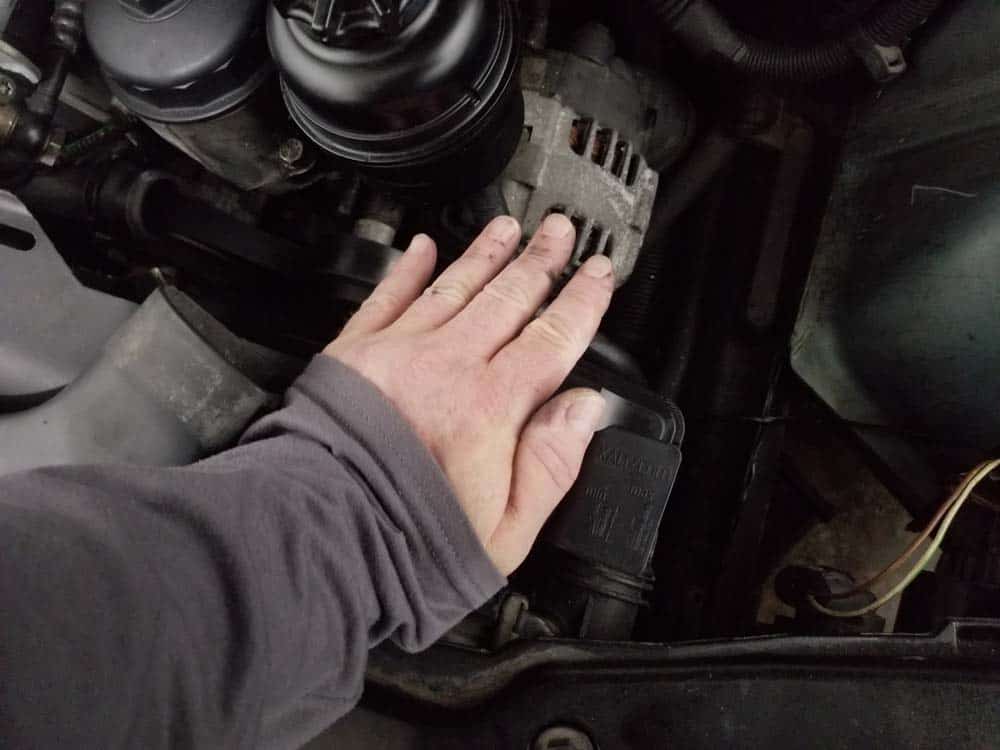
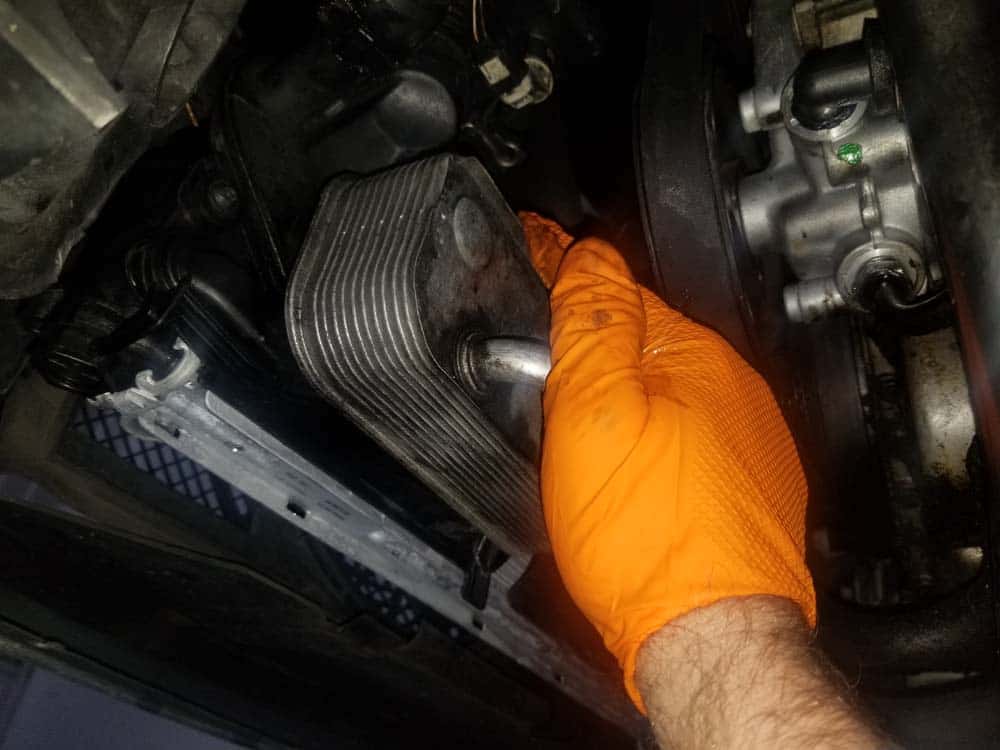
- If your car has an automated manual, you lot will need to remove the transmission fluid cooler from the bottom of the radiator. First, locate the fluid cooler on the left side of the car.

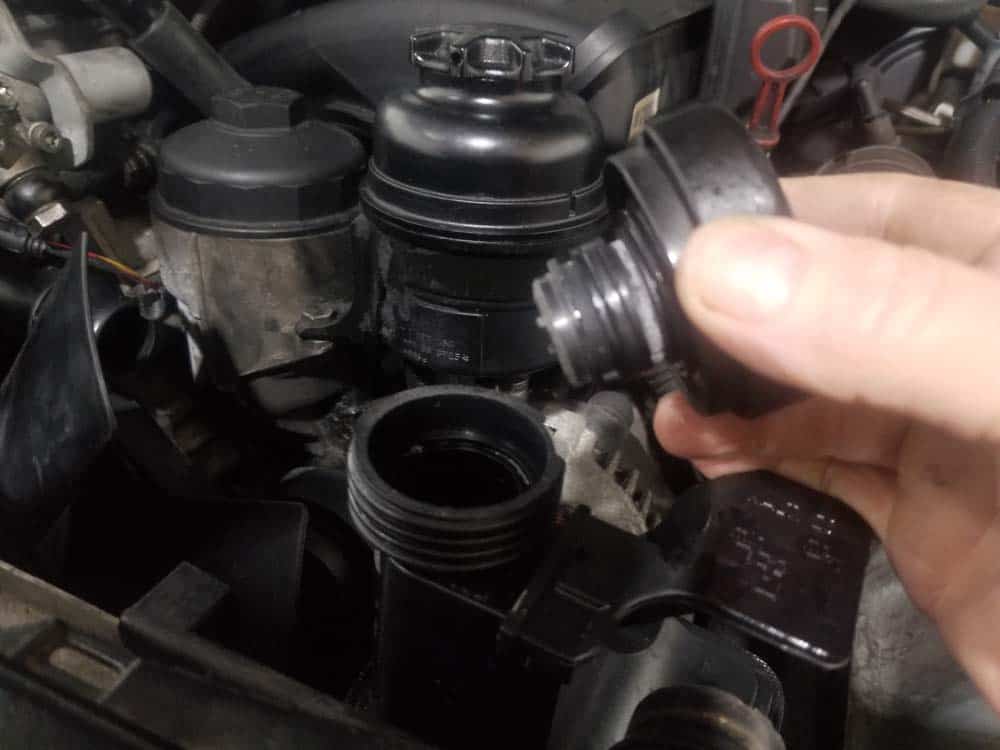
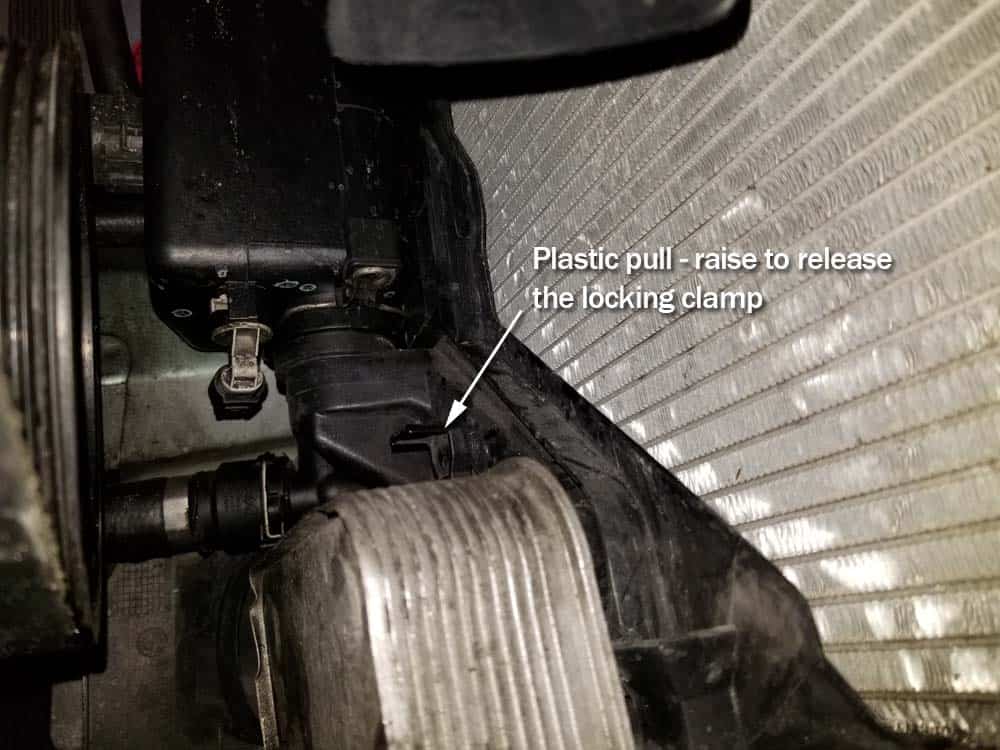
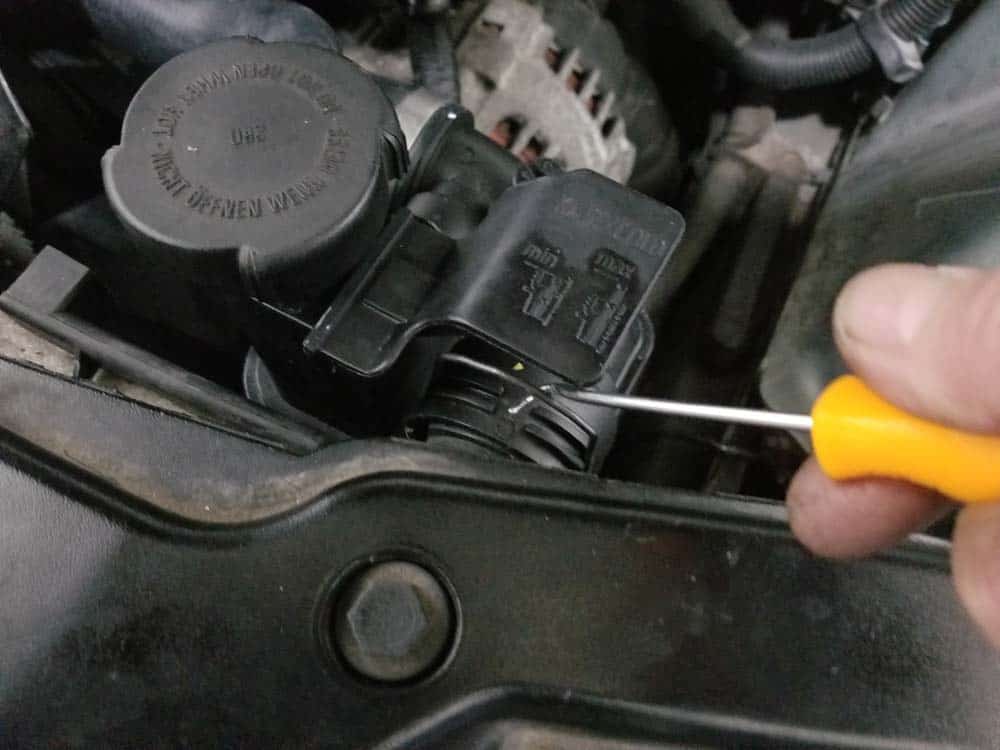
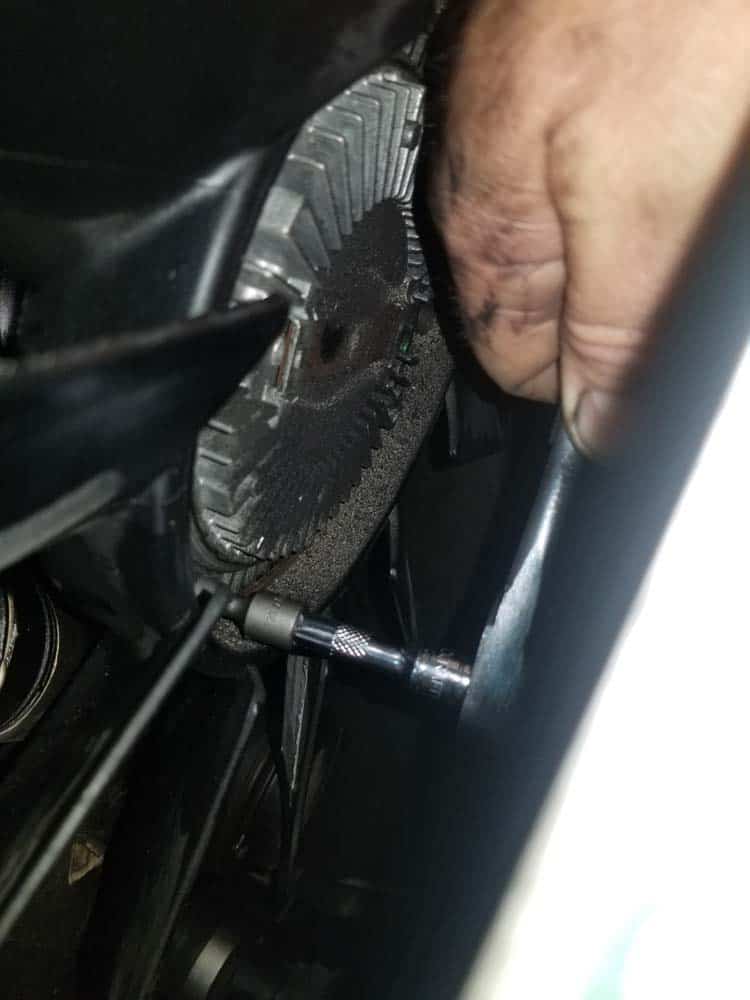
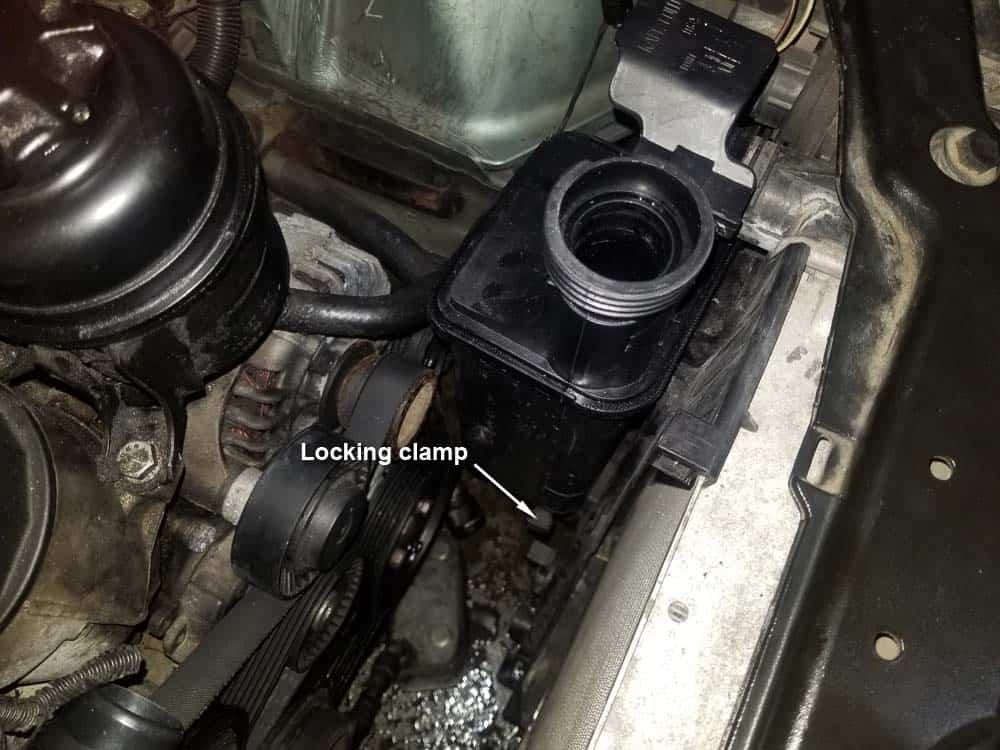
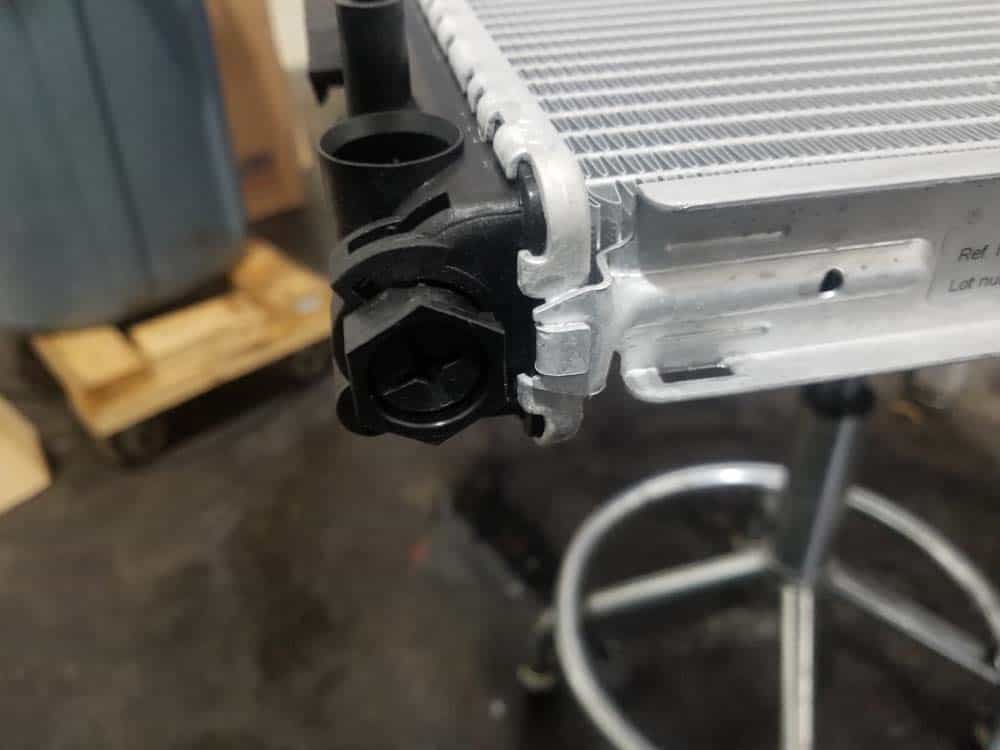
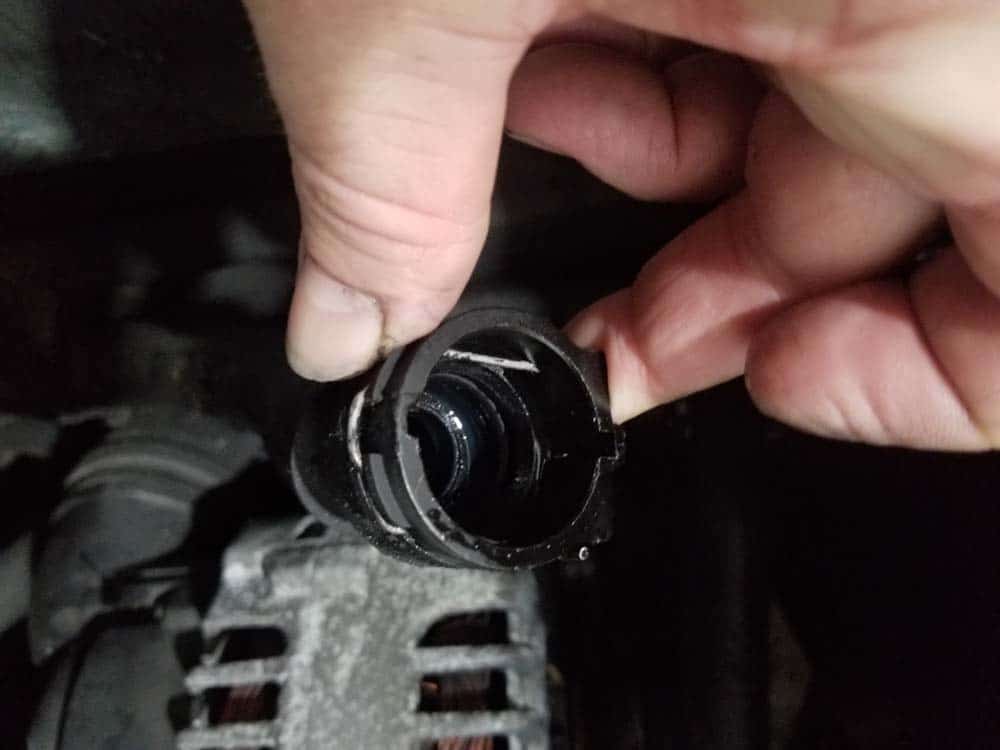
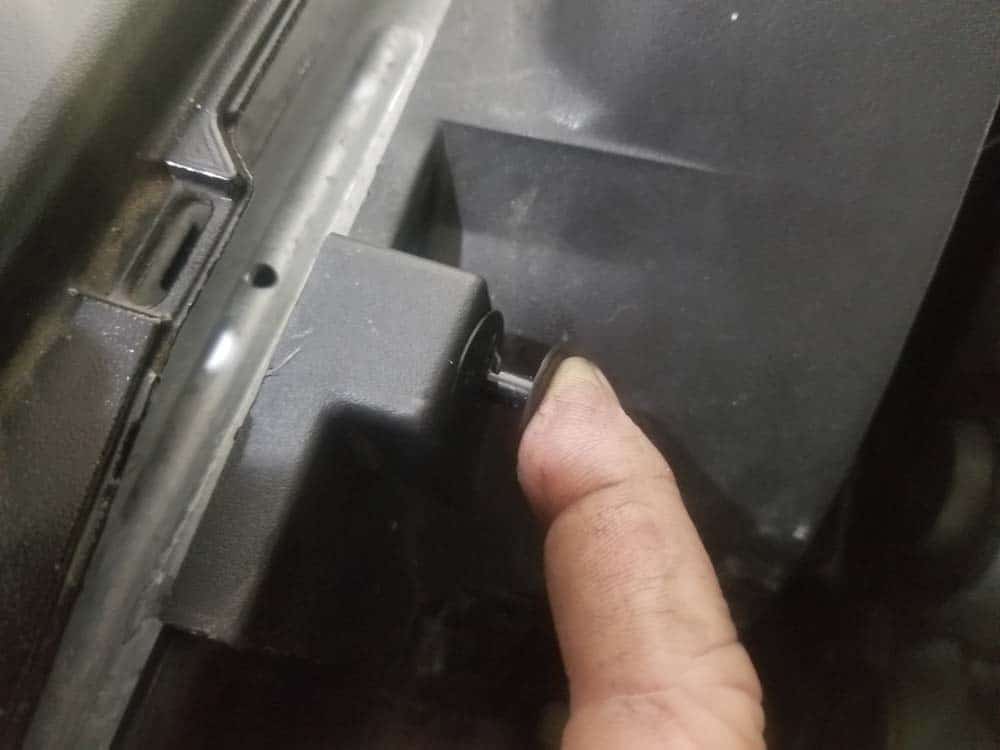
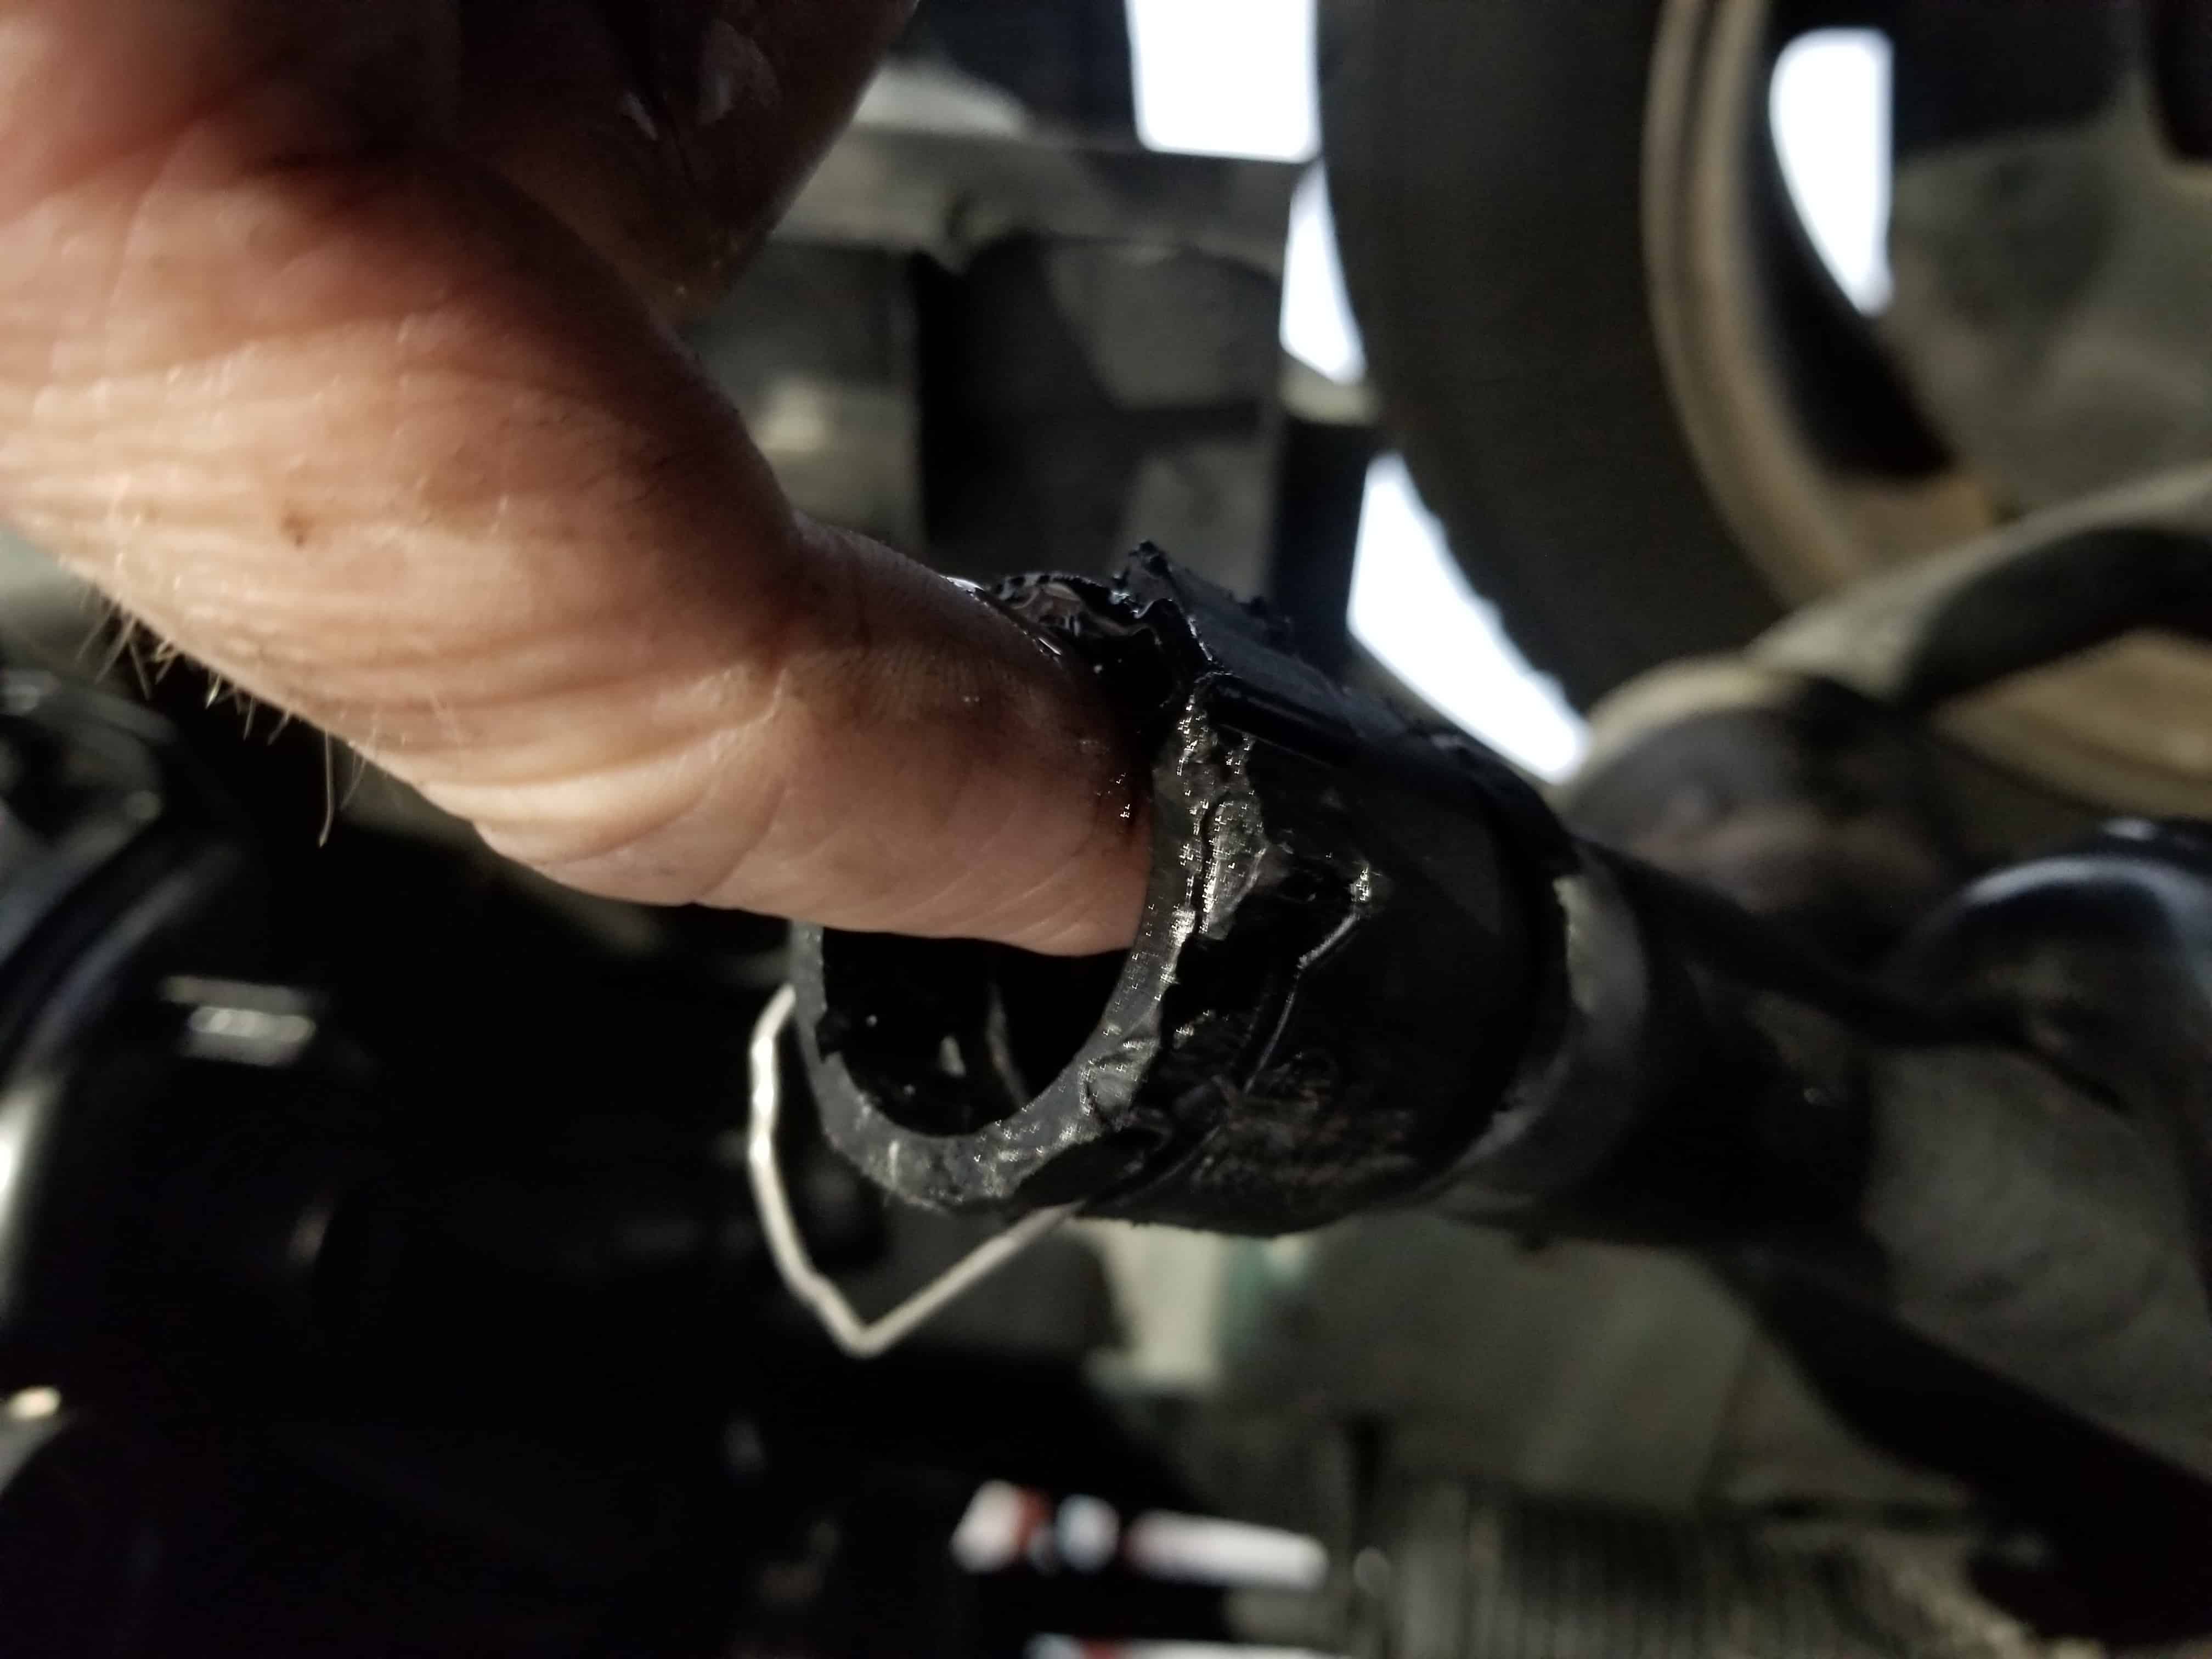
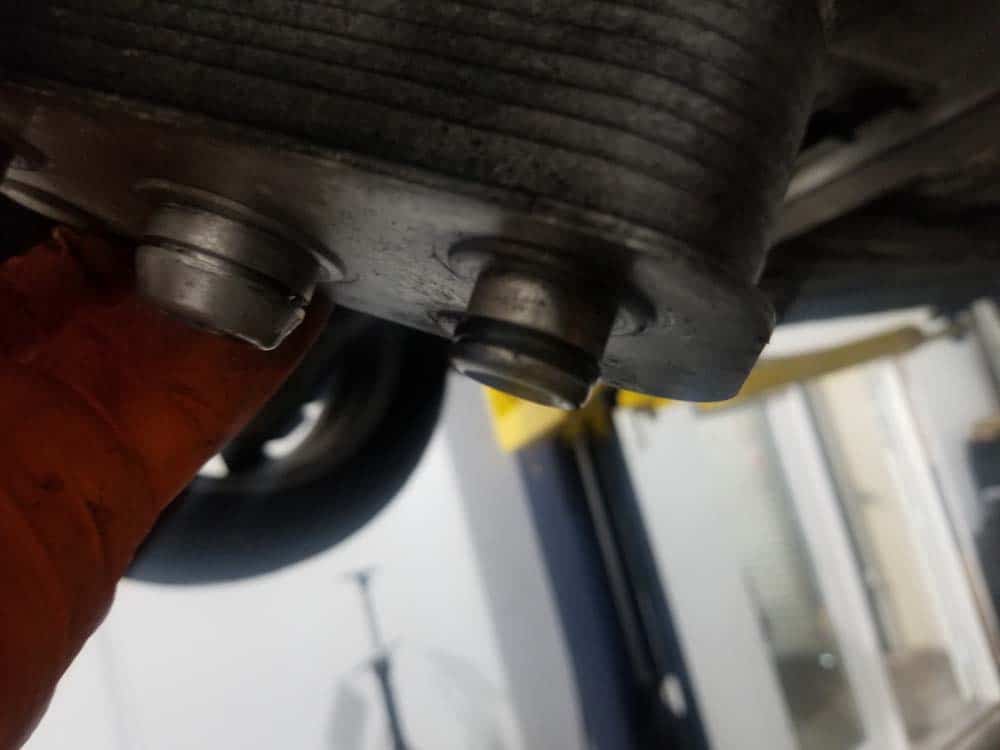
- Release the metal locking clamp that secures the fluid cooler to the radiator. The locking clamp has a plastic pull fastened to the top of information technology. Locate the plastic pull and lift information technology upward to release the clamp. If the plastic pull is being stubborn, you lot can featherbed it by simply pushing the clench up from the bottom of the fitting with your fingernail or a small screwdriver (see epitome beneath).

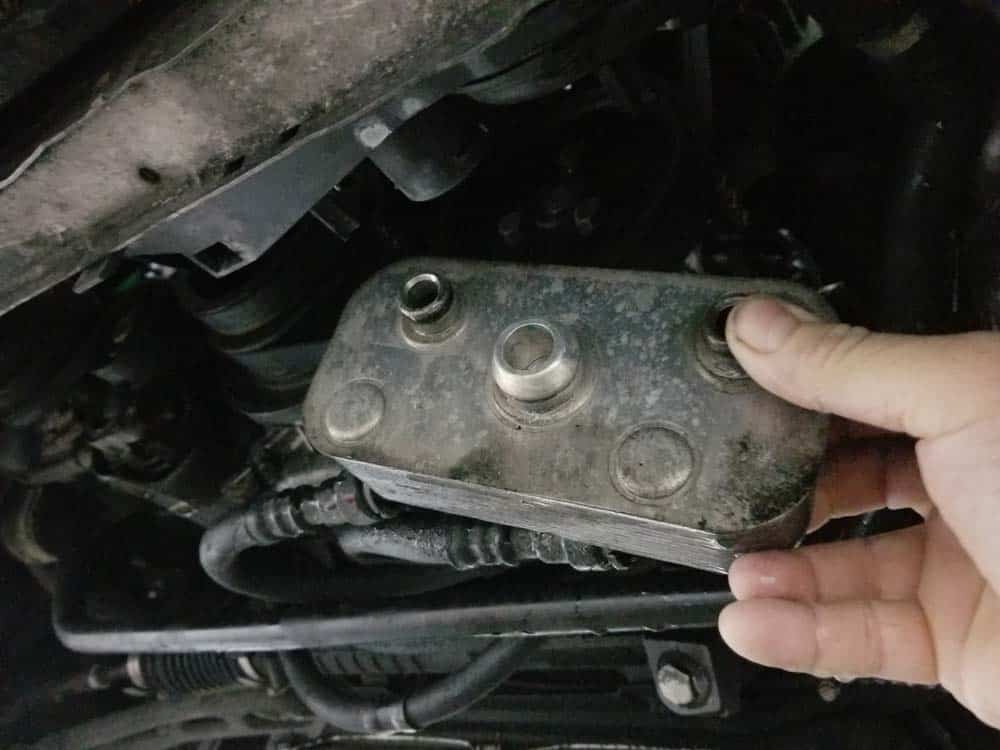
- Position a drain pan under the transmission cooler. Practice NOT put your face under the cooler when removing it...there is quite a bit of coolant left in it. Grasp the manual cooler with 2 easily and pull information technology loose from the radiator.
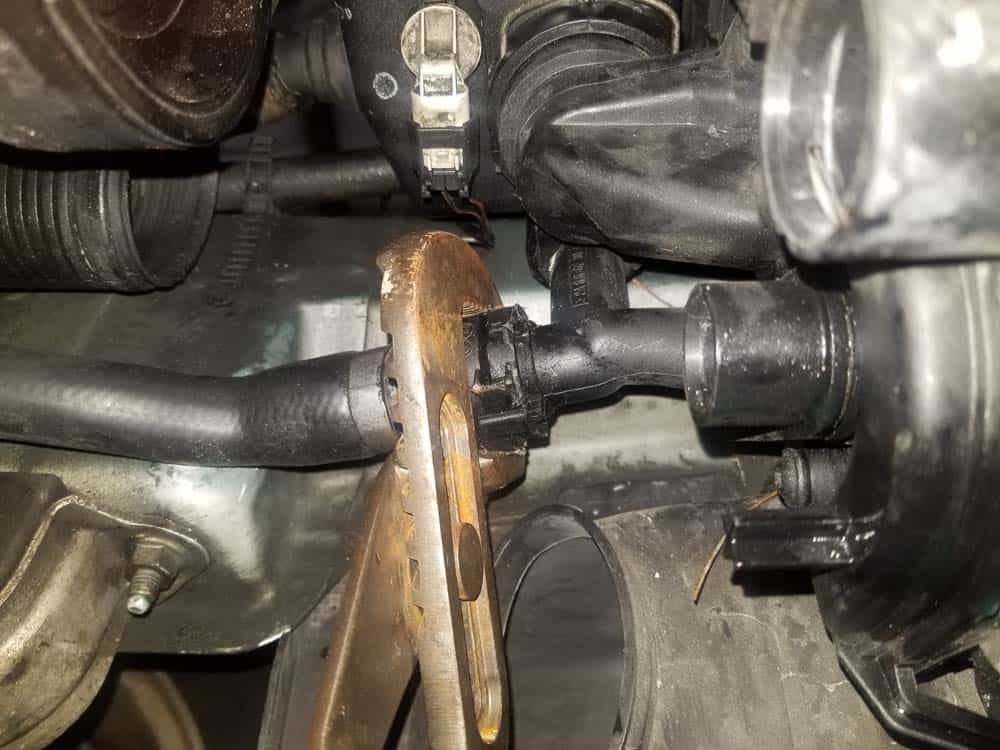
- Next, release the metal prune on the lower left radiator coolant hose. This coolant hose tin exist very difficult to remove. Take your fourth dimension, carefully rocking it dorsum and forth to loosen it. If you lot notwithstanding cannot go information technology to release from the radiator, endeavour using a large pair of sideslip articulation pliers (see image beneath) to gently rock it while pulling. Employ a large flat blade screwdriver to endeavor and gently pry it off while pulling with the pliers, existence careful not to damage any fittings. Remove the hose from the radiator.

Department 2 - Removing the Fan Shroud and Cooling Fan
The fan shroud and cooling fan must be cleared out to allow enough infinite to remove and reinstall the radiator. The cooling fan is notoriously difficult to remove on many BMW E46s due to its mounting nut (clutch nut) seizing to the caster that spins it. We give directions below on how to remove the fan and shroud if you meet a seized clutch nut during your repair.
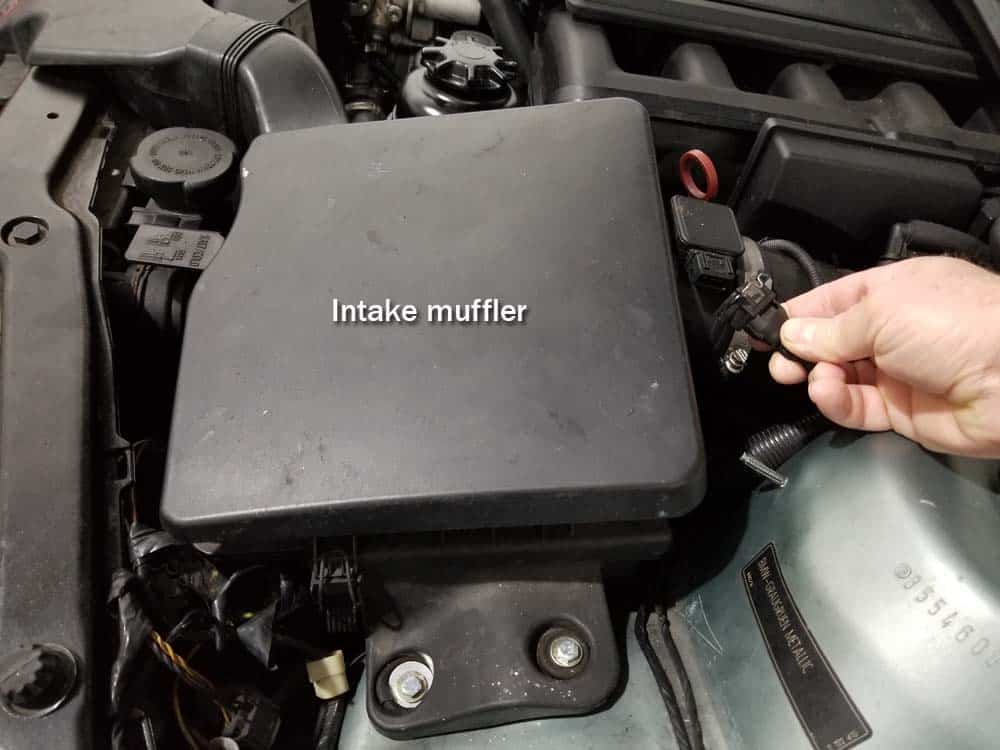
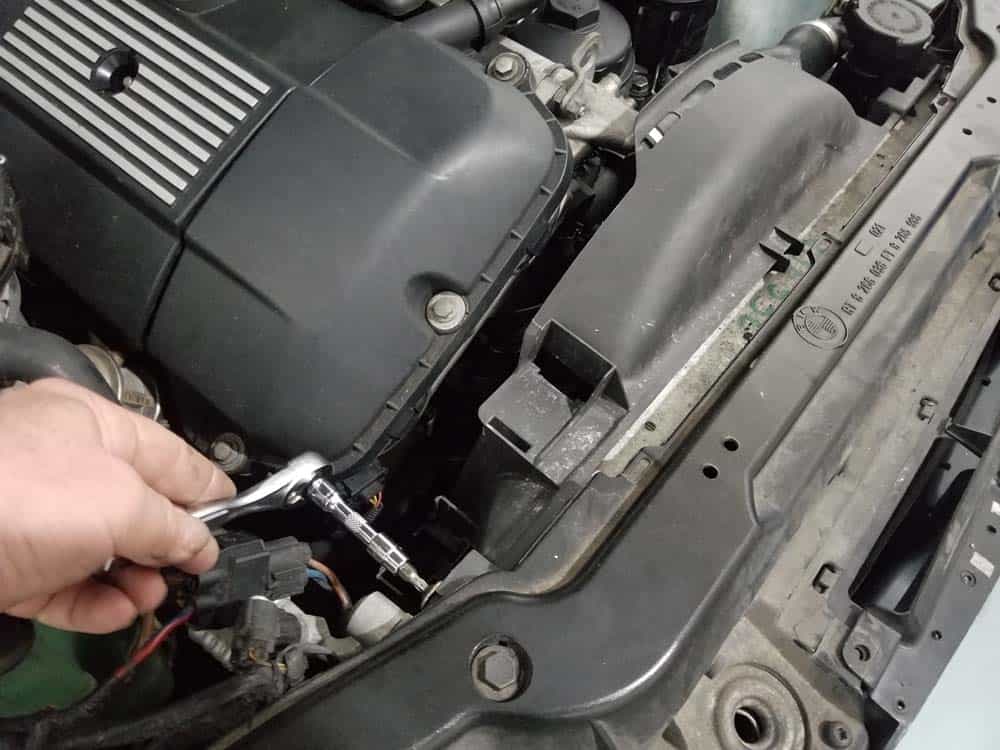
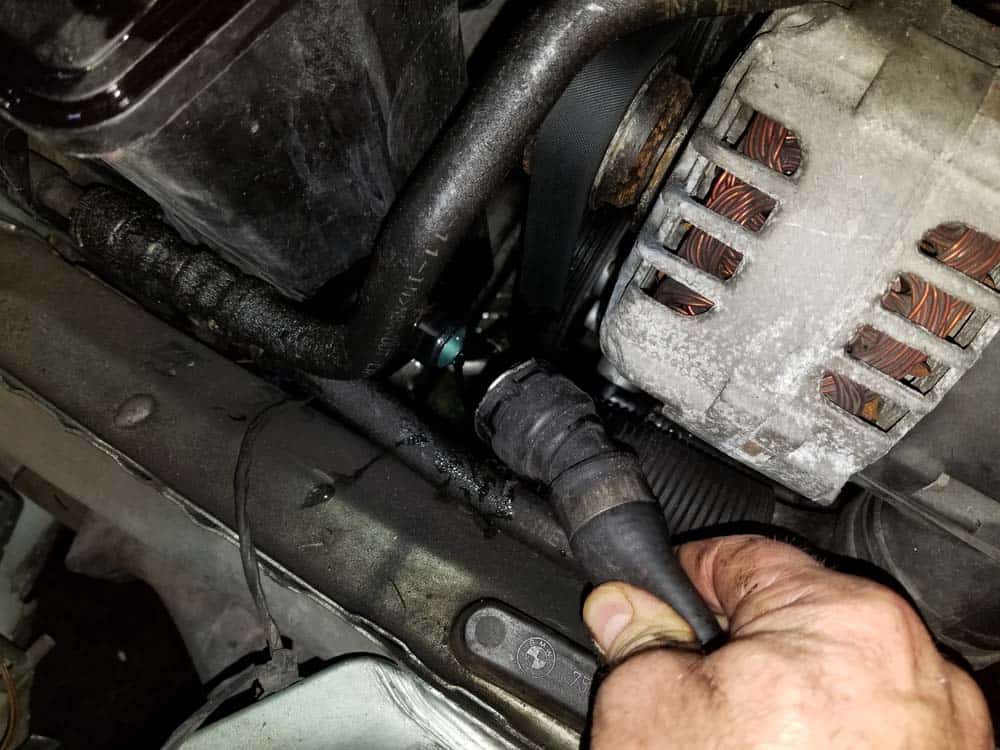
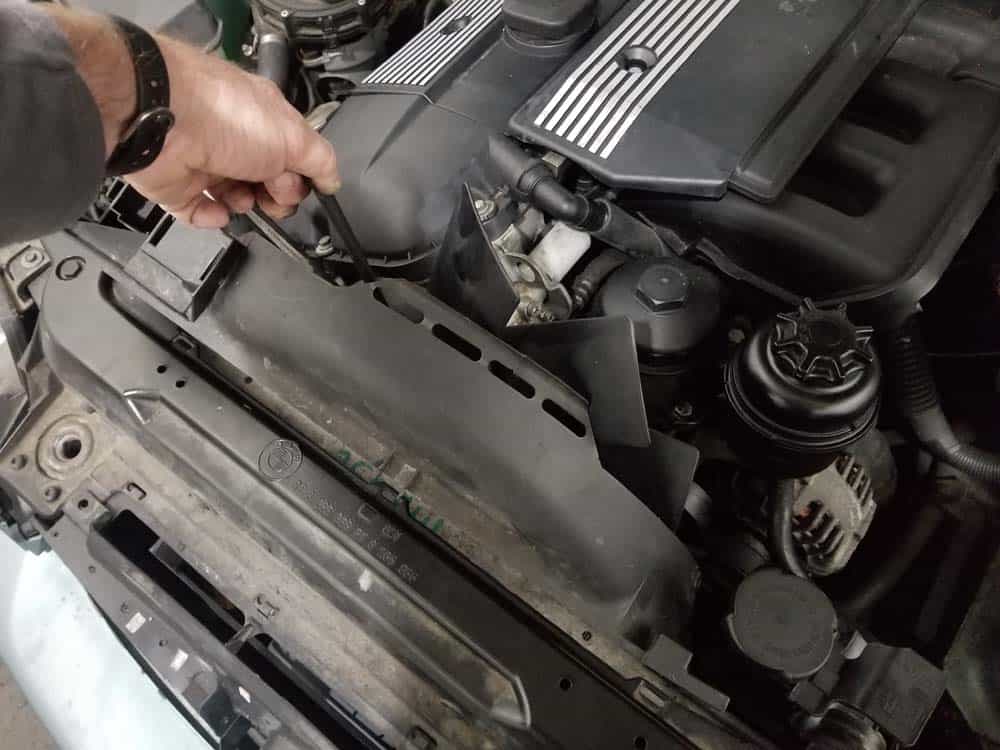
- First by disconnecting the mass air flow (MAF) sensor.
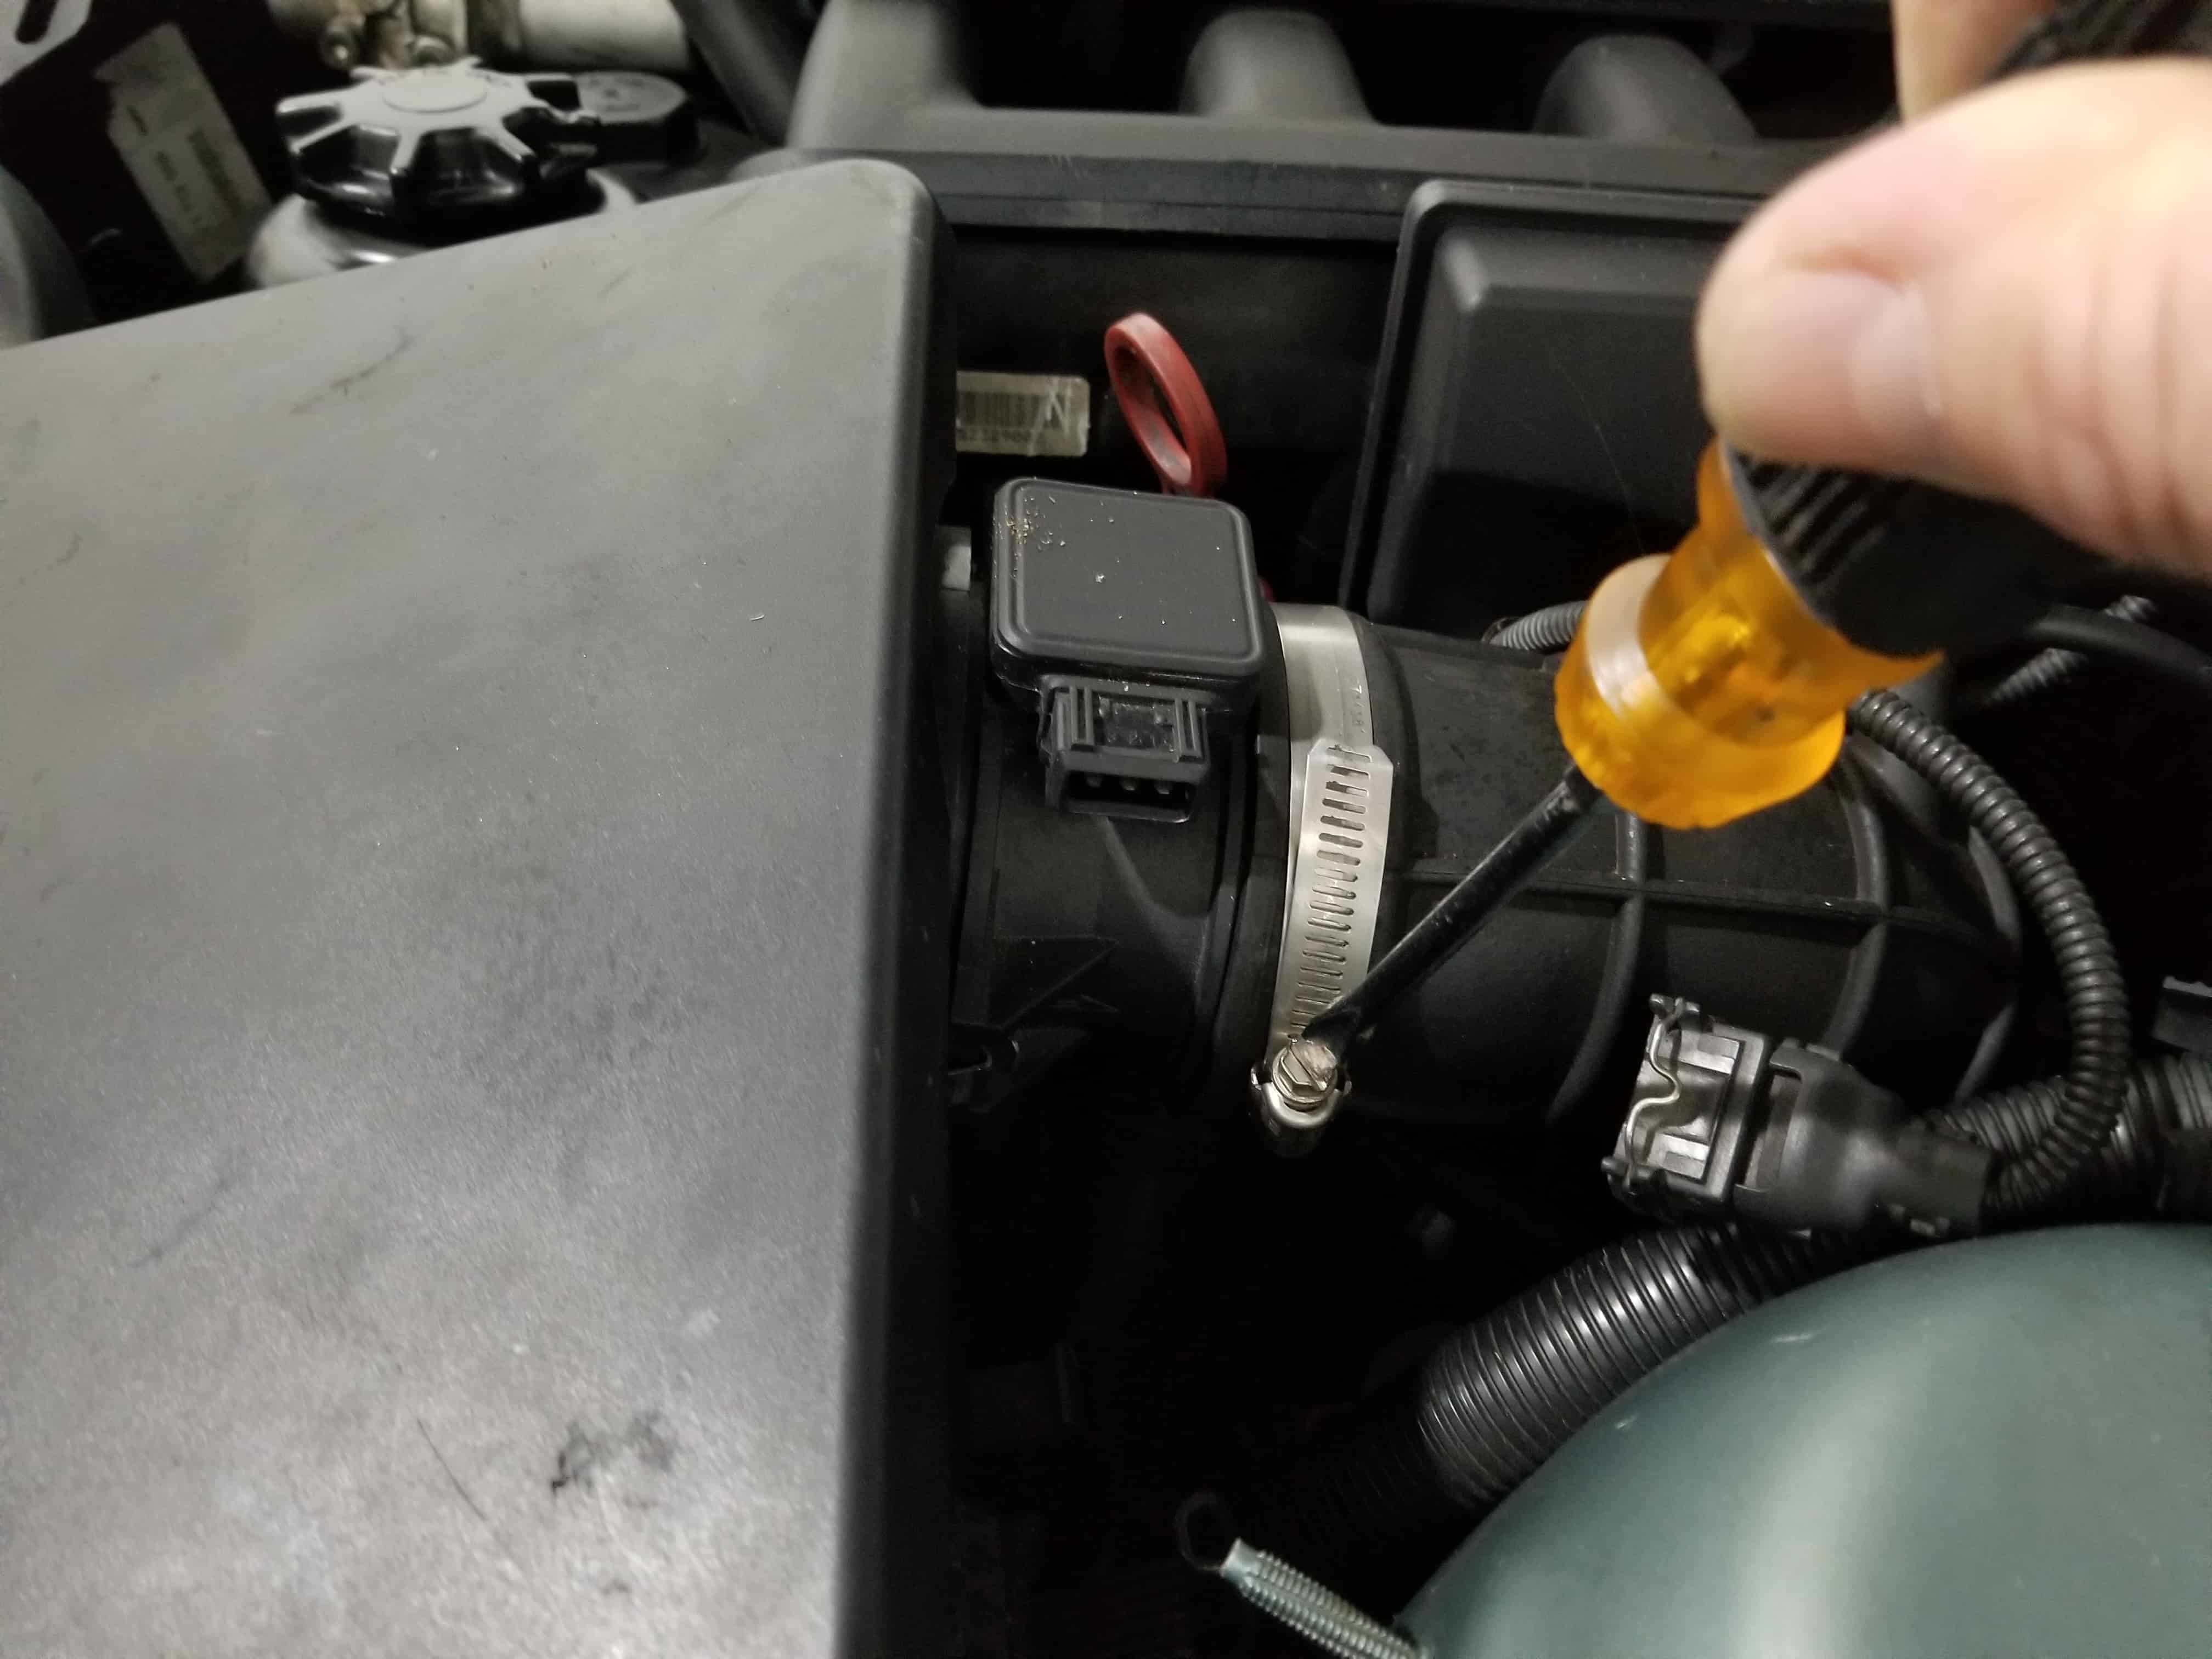
- Using a flat bract screwdriver, loosen the hose clamp on the intake boot.
- Unlatch the four clamps on the chapeau of the intake muffler. Note that one of the clamps is hard to get to…use a metal pick to release if you can't reach it with your fingers. Remove the lid from the vehicle.
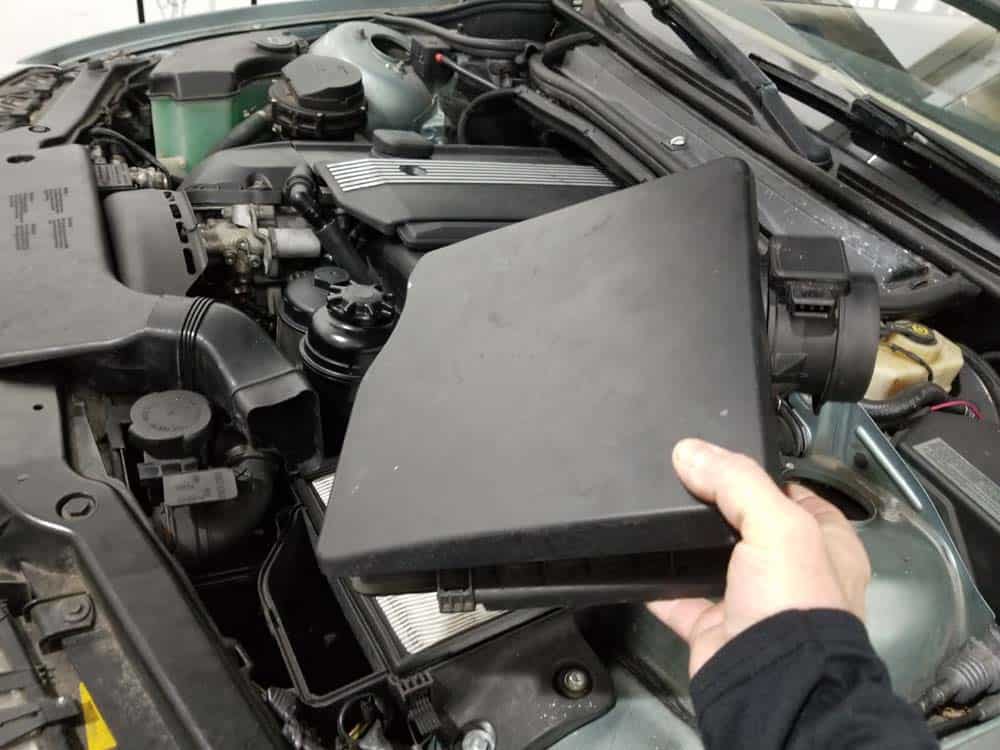
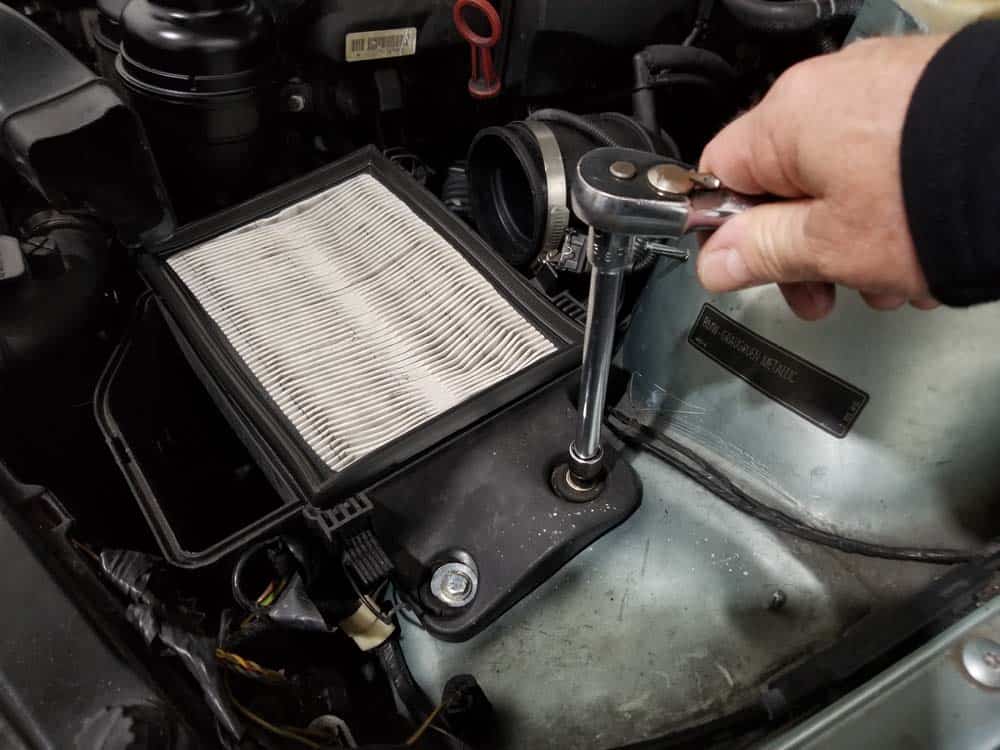
- Using a 10mm socket wrench, remove the 2 intake muffler mounting bolts. Remove the intake muffler from the engine compartment.

- Remove the plastic air intake tube.
- Use a trim removal tool to remove the three plastics rivets anchoring the air intake to the frame of the vehicle. Remove the intake from the vehicle.
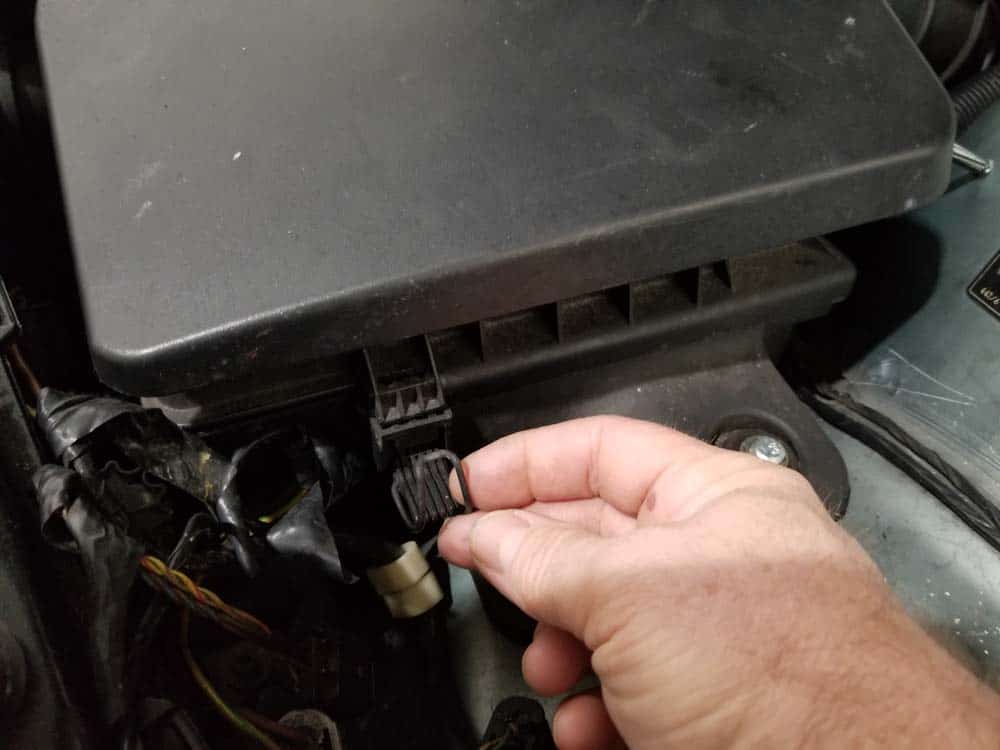
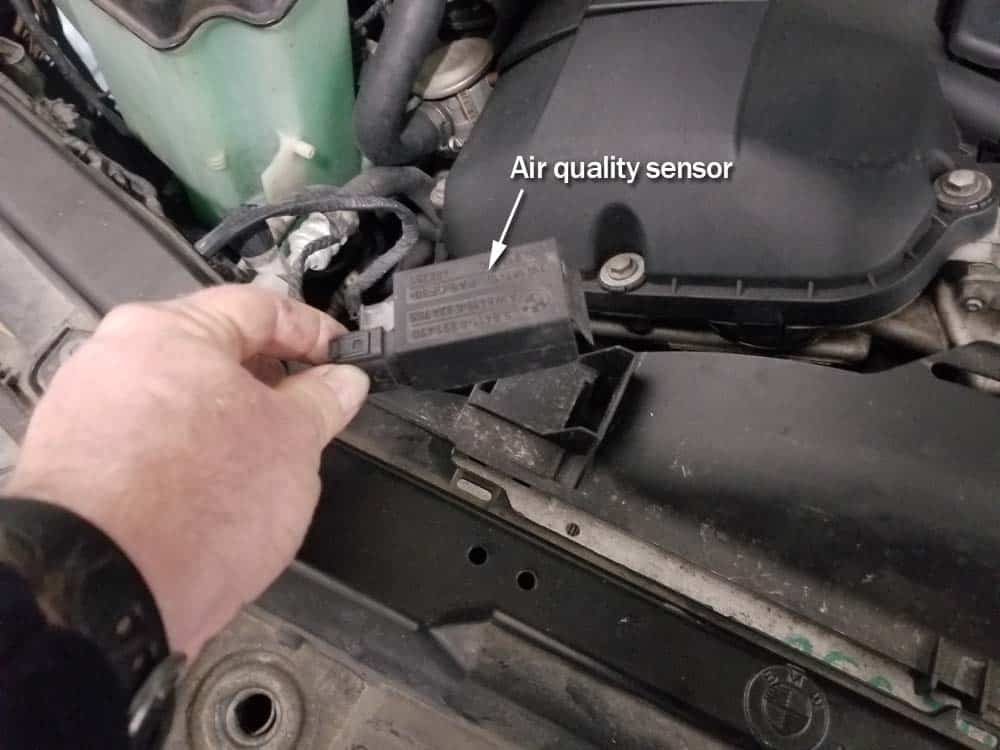
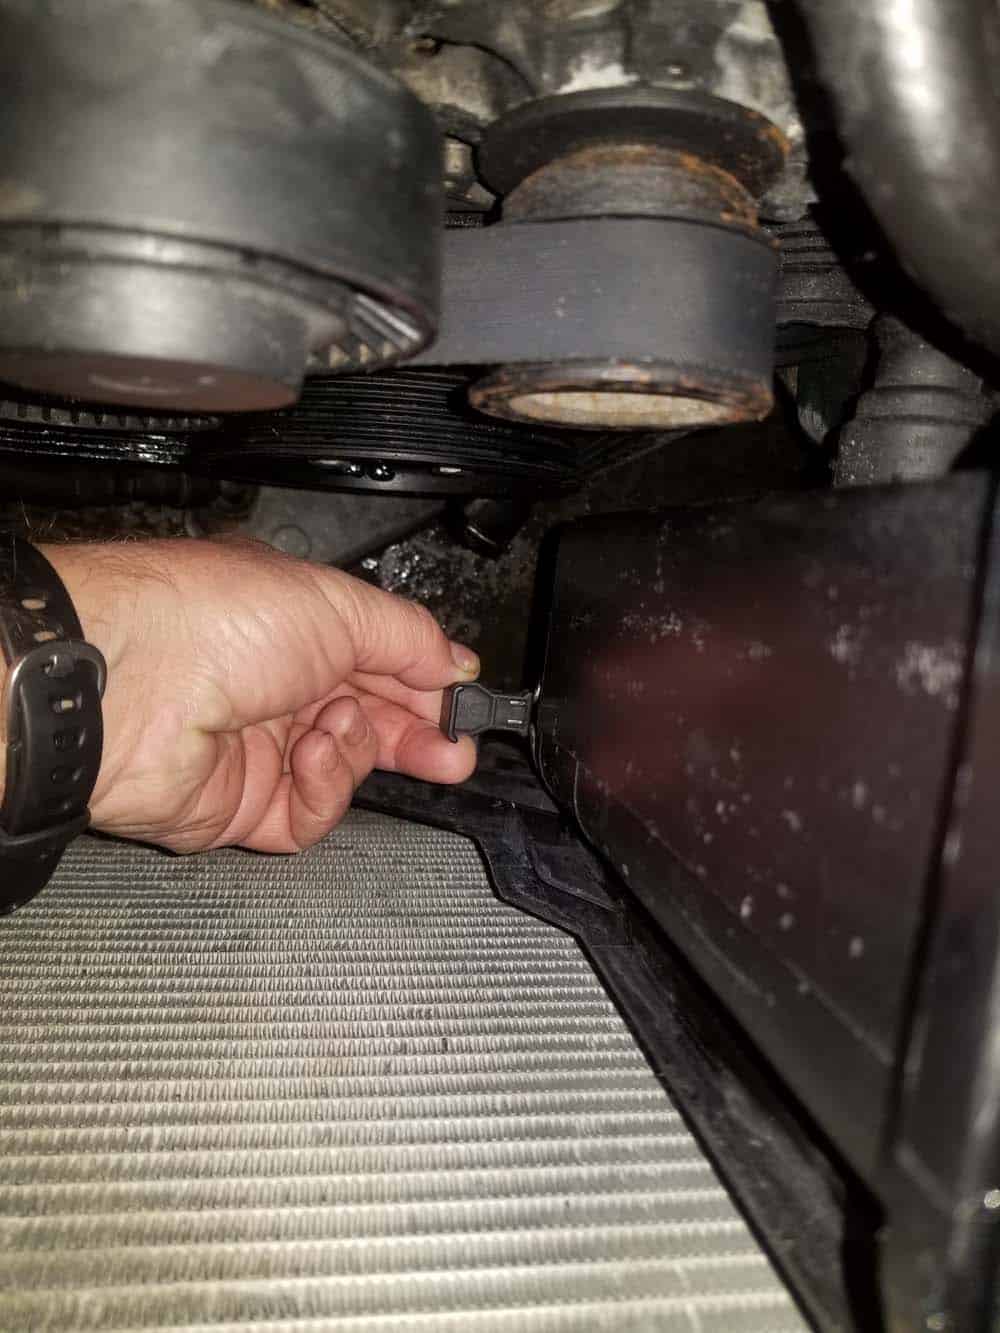
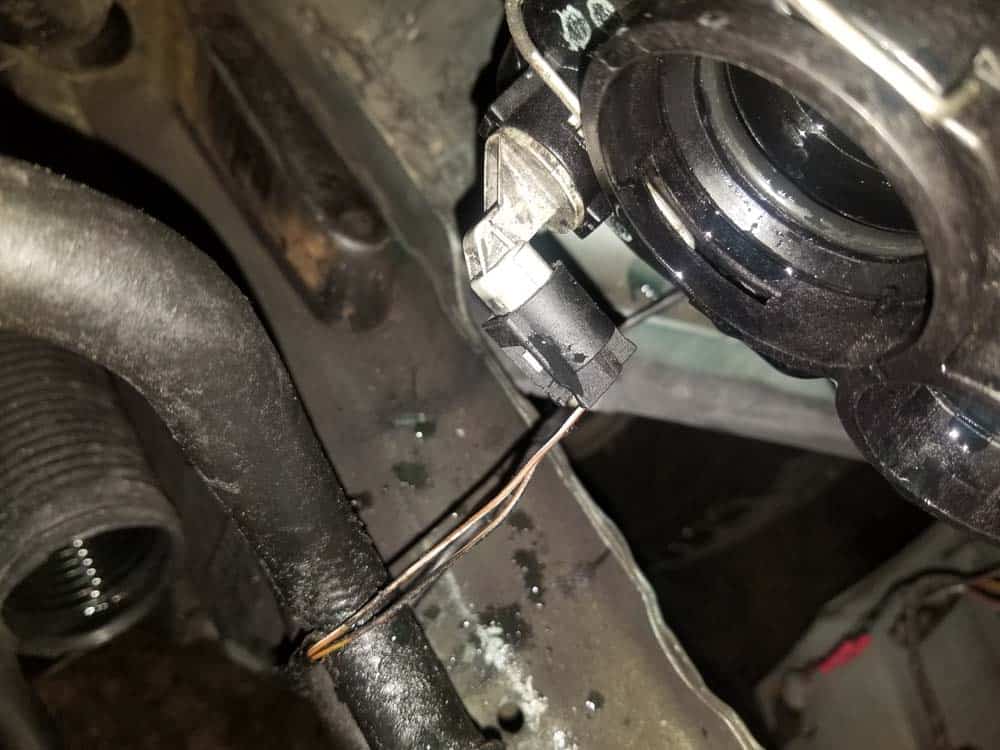
- Remove the air quality sensor and the wiring harness connector from the fan shroud and safely tuck out of the way.
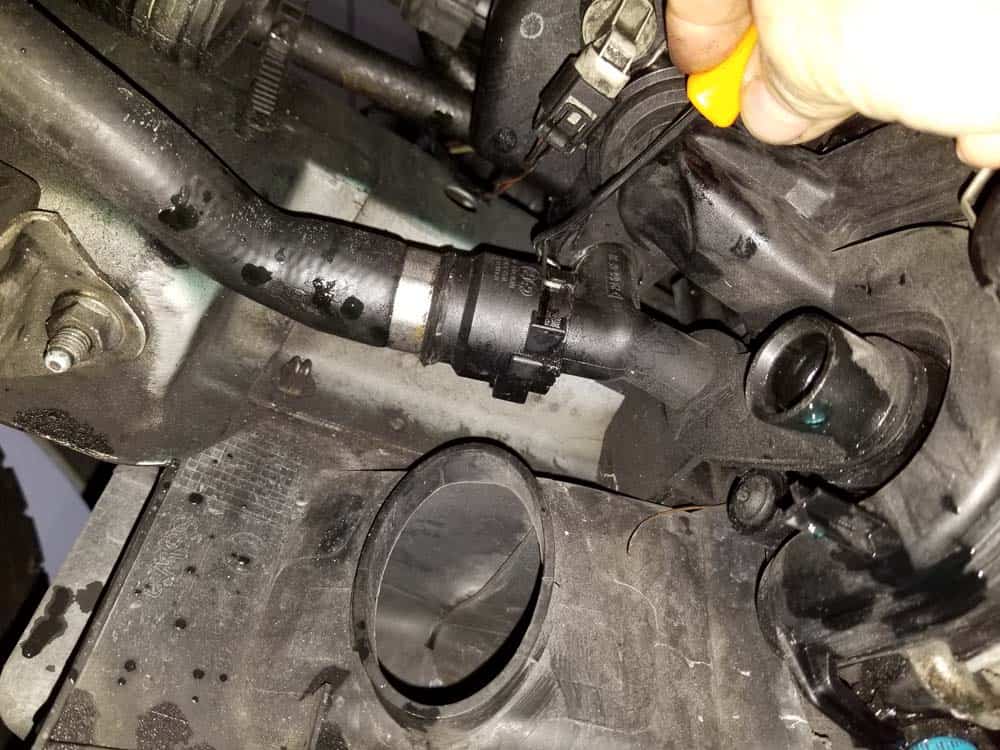
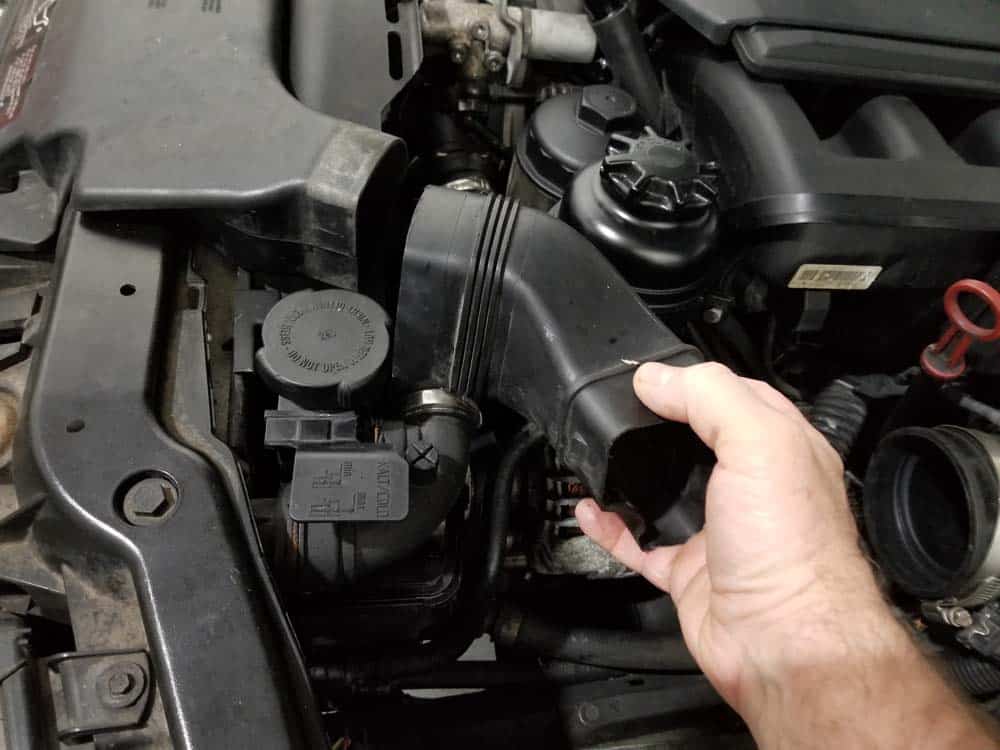
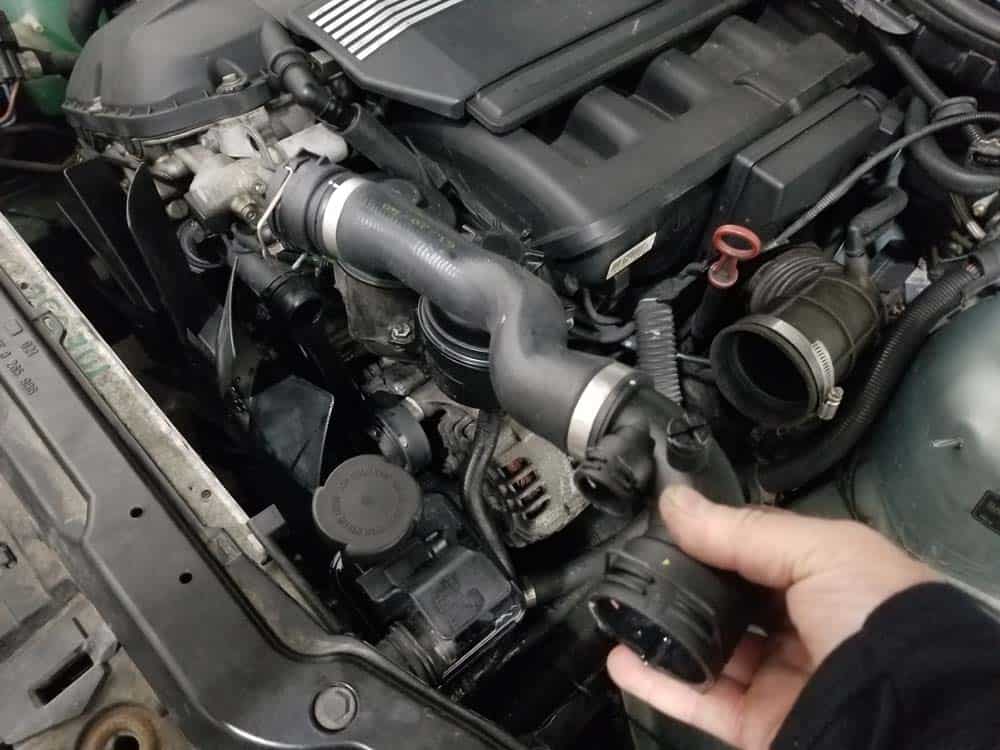
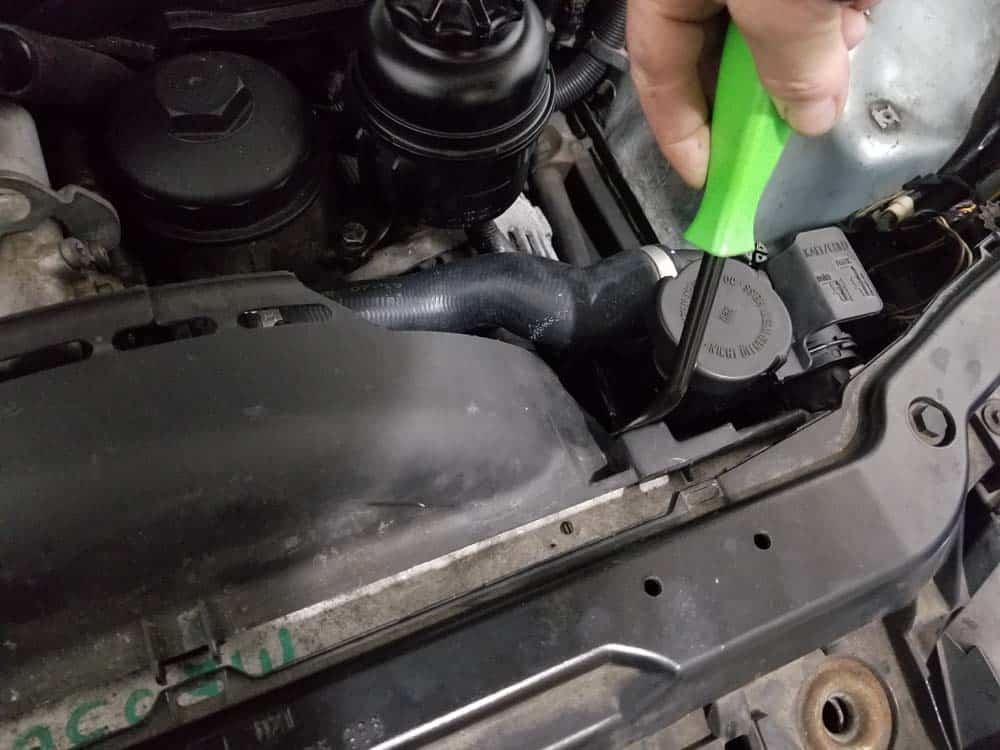
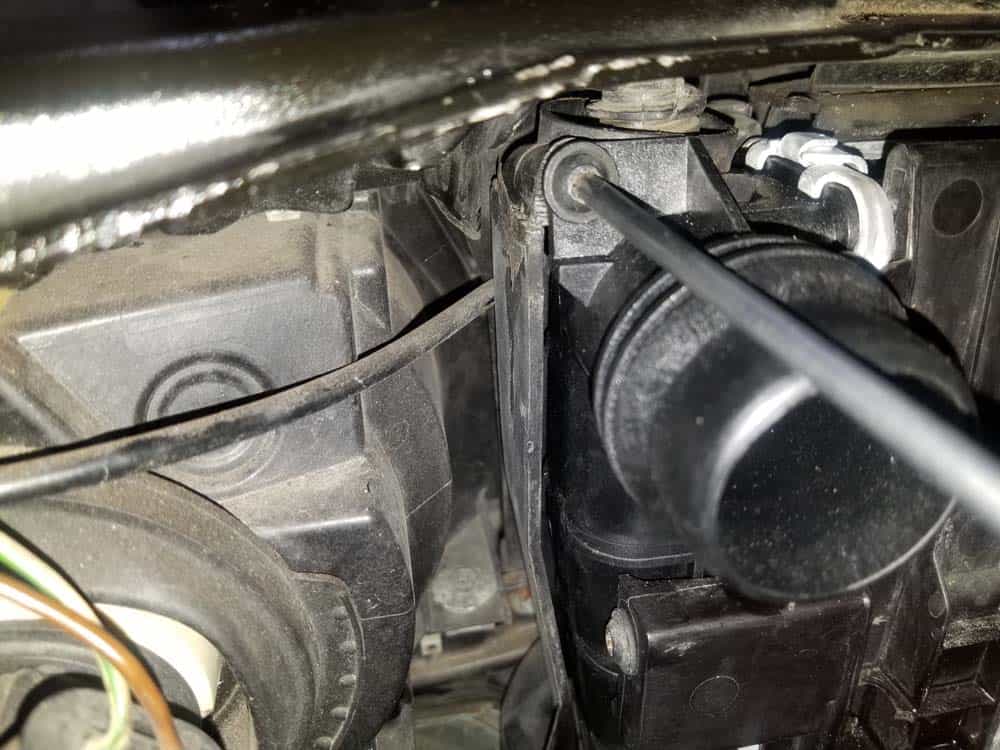
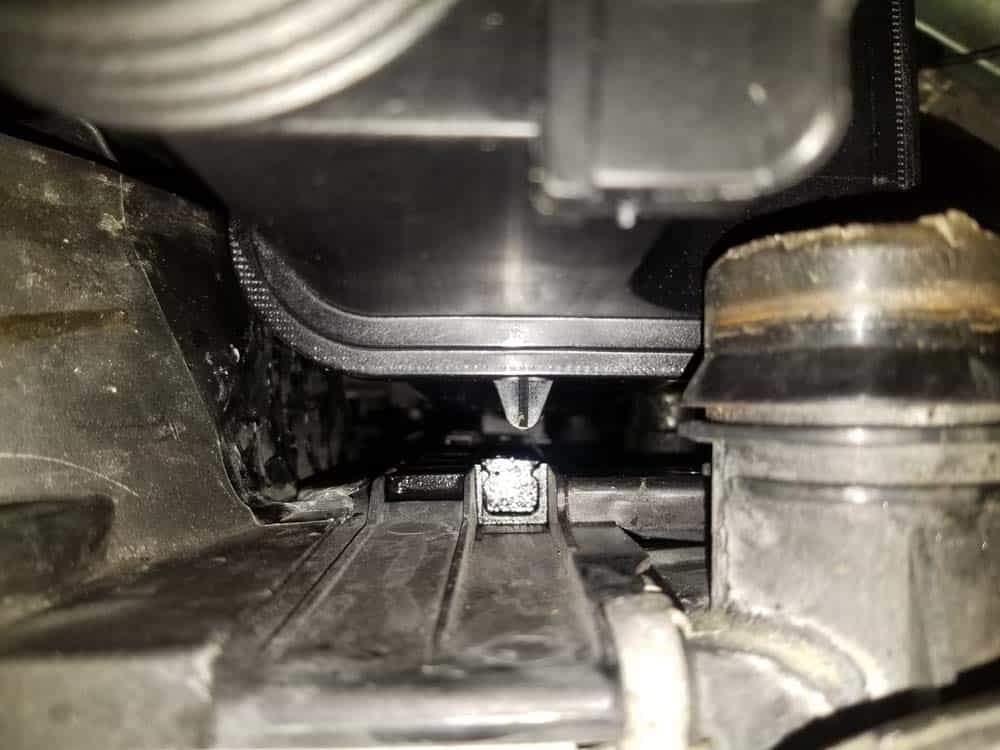
- Release the clamps securing the upper radiator hose to the thermostat housing and the expansion tank. Remove the hose from the engine.
- Don't try and remove the fan shroud still...it is easier to remove with the cooling fan and fan clutch. In that location is besides less chance of breaking the fan shroud if you remove information technology with the cooling fan.
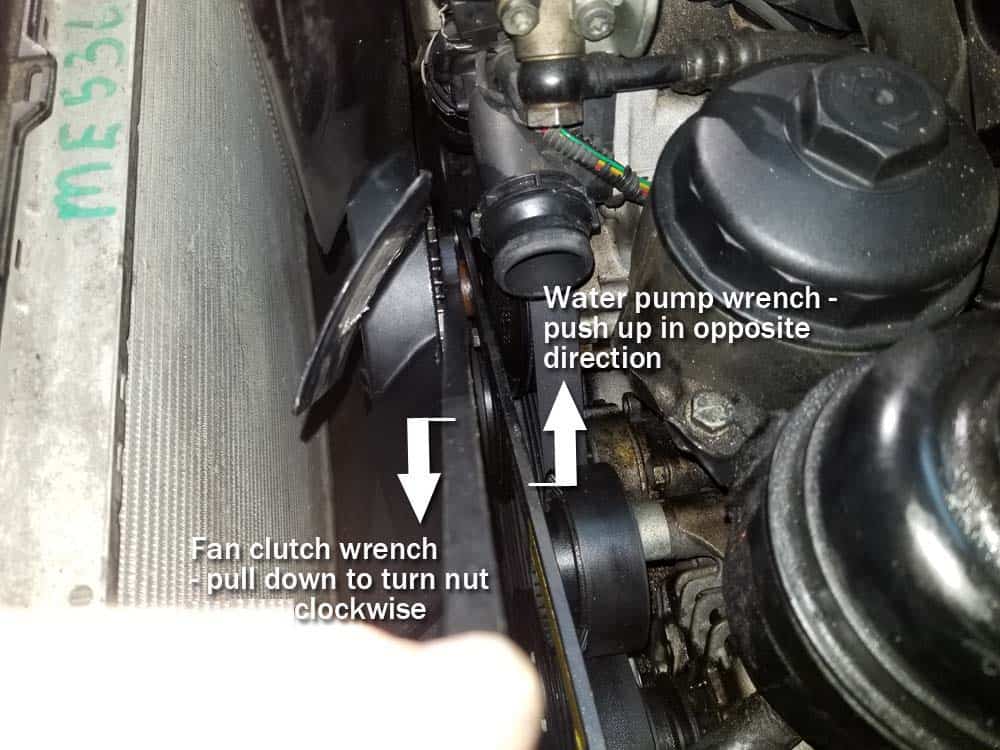
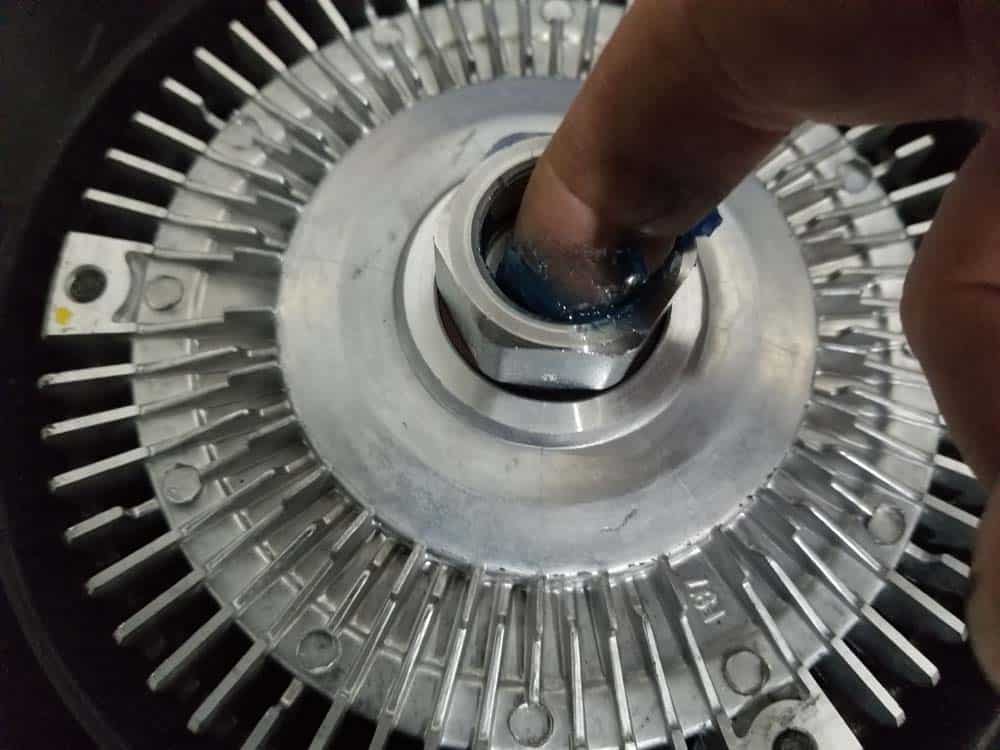
- Adjacent, the infamous cooling fan and fan clutch must be removed from the h2o pump pulley. If the nut on the fan clutch is seized and cannot be removed from the water pump pulley with the special fan clutch removal tool (which is a very common occurrence), then y'all volition have to unbolt and remove the cooling fan from the clutch. Remember the fan clutch nut is a reverse thread...you must turn it clockwise to loosen it.
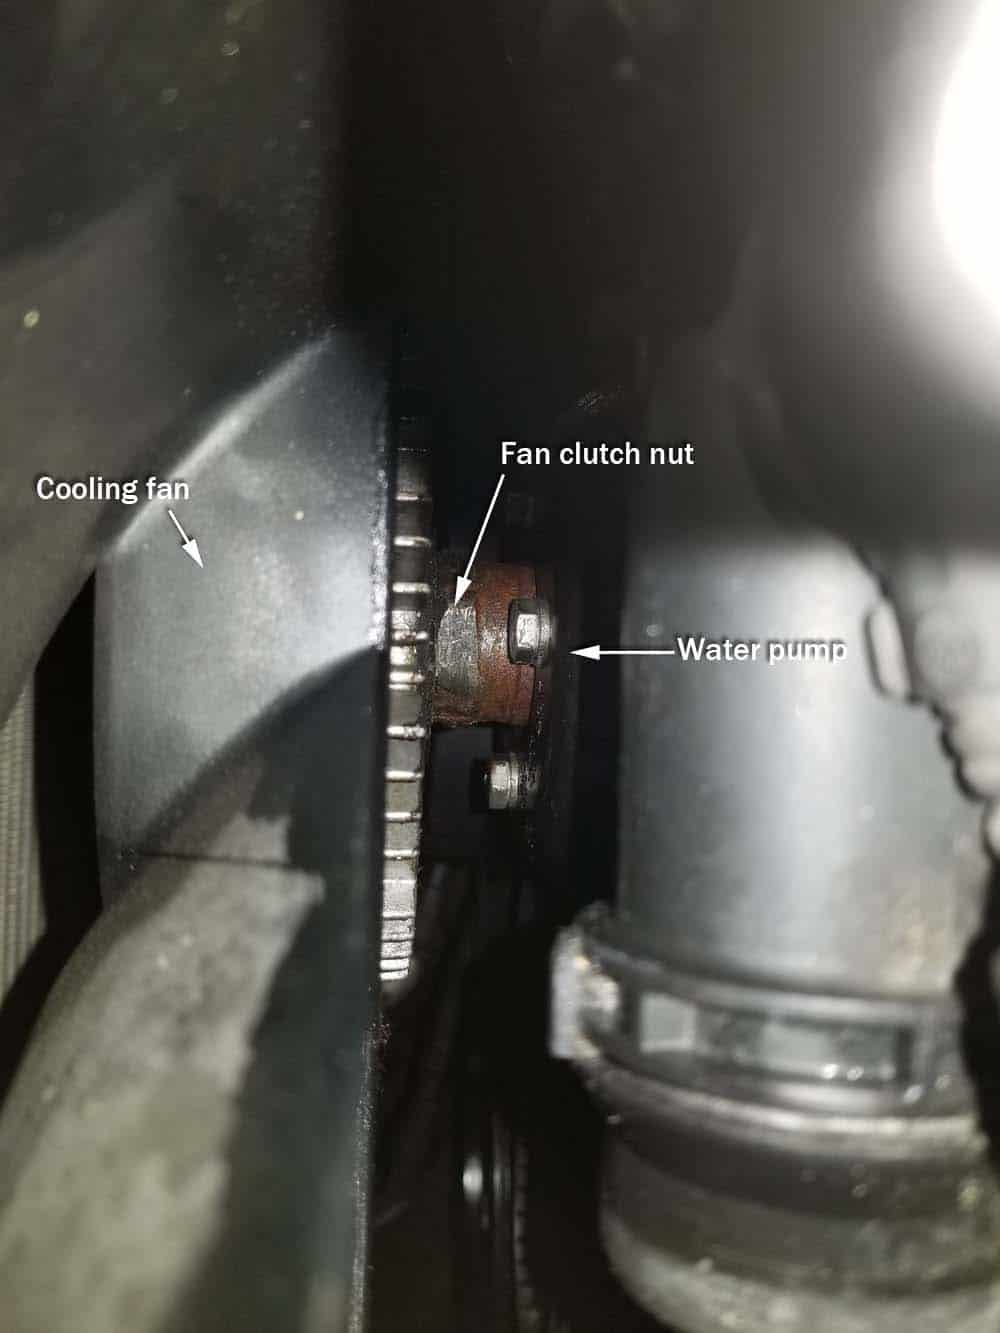
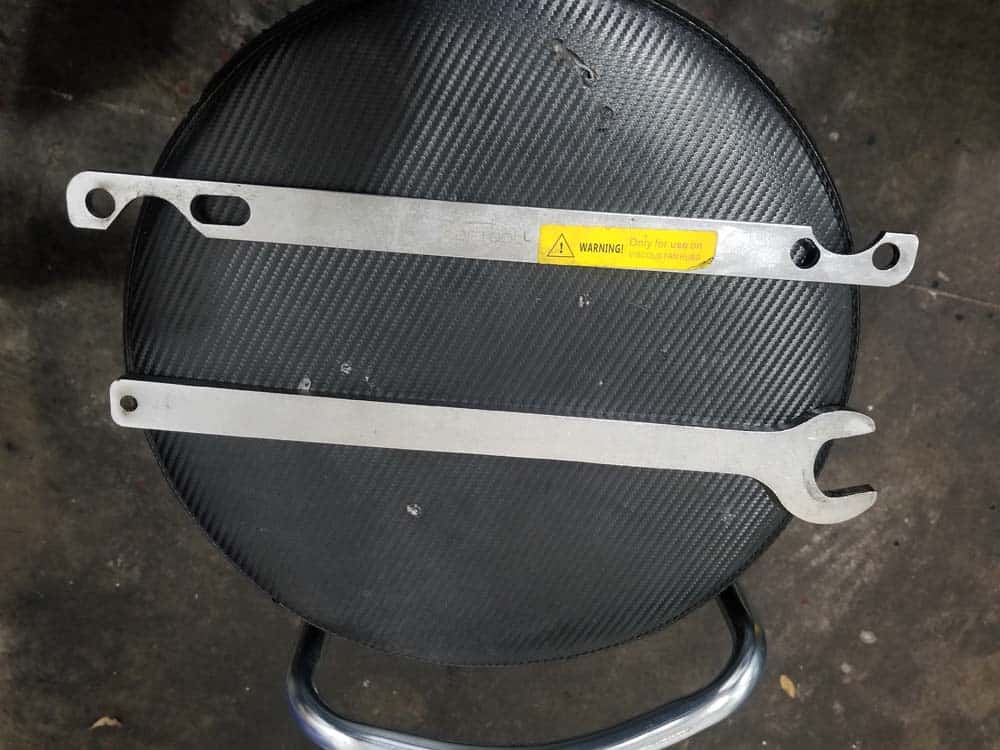
- The first step in all of this is to try and remove the fan clutch from the caster with the special fan clutch removal tool. Identify the fan clutch tool on the caster and the clutch nut as shown in the post-obit image. Think the fan clutch nut is a reverse thread...you must turn it clockwise to loosen information technology.
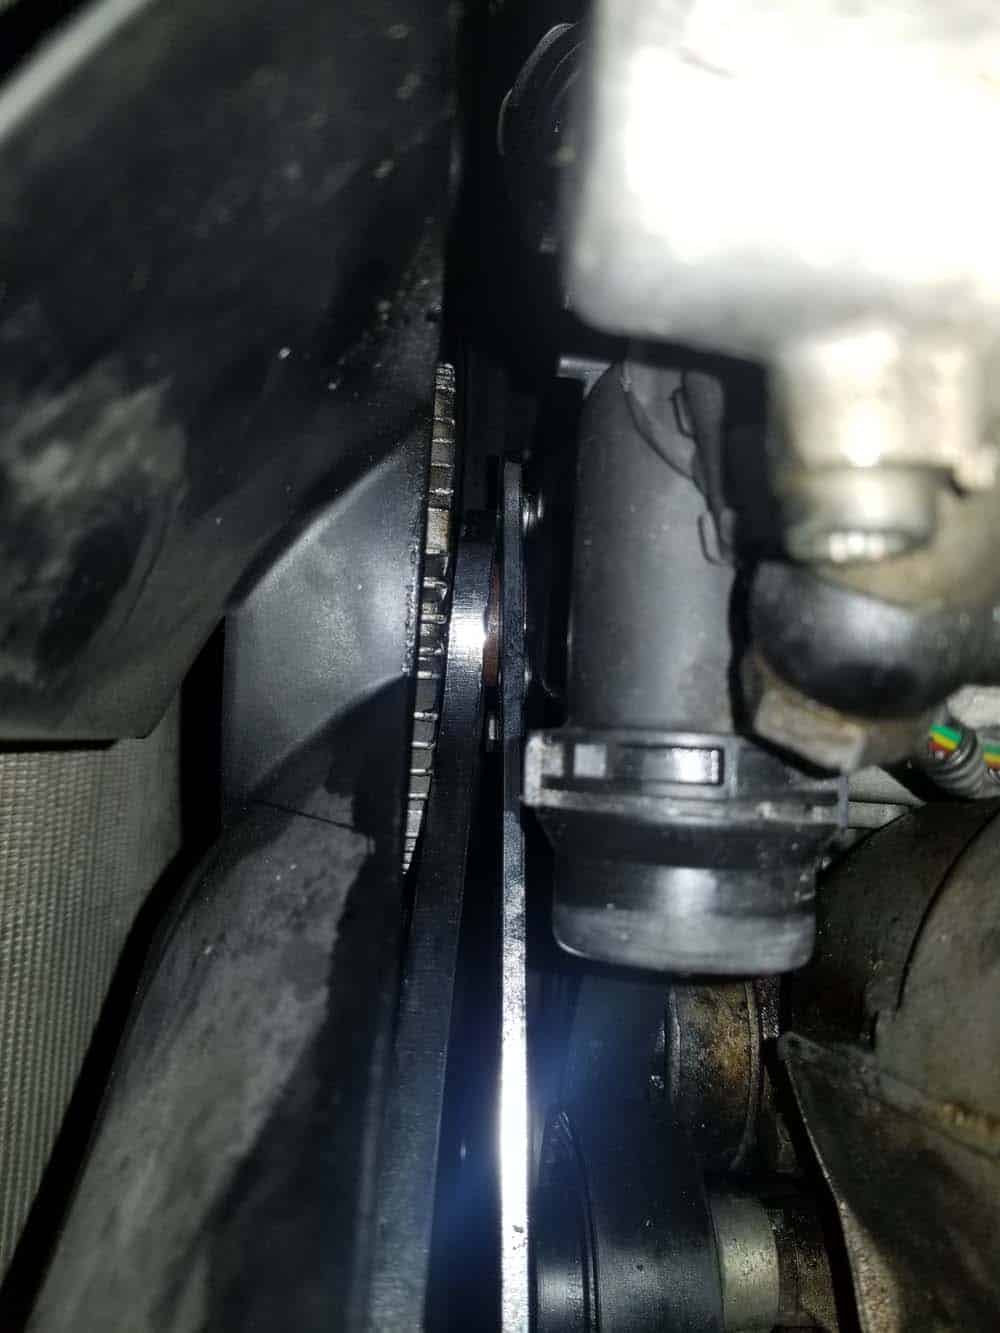
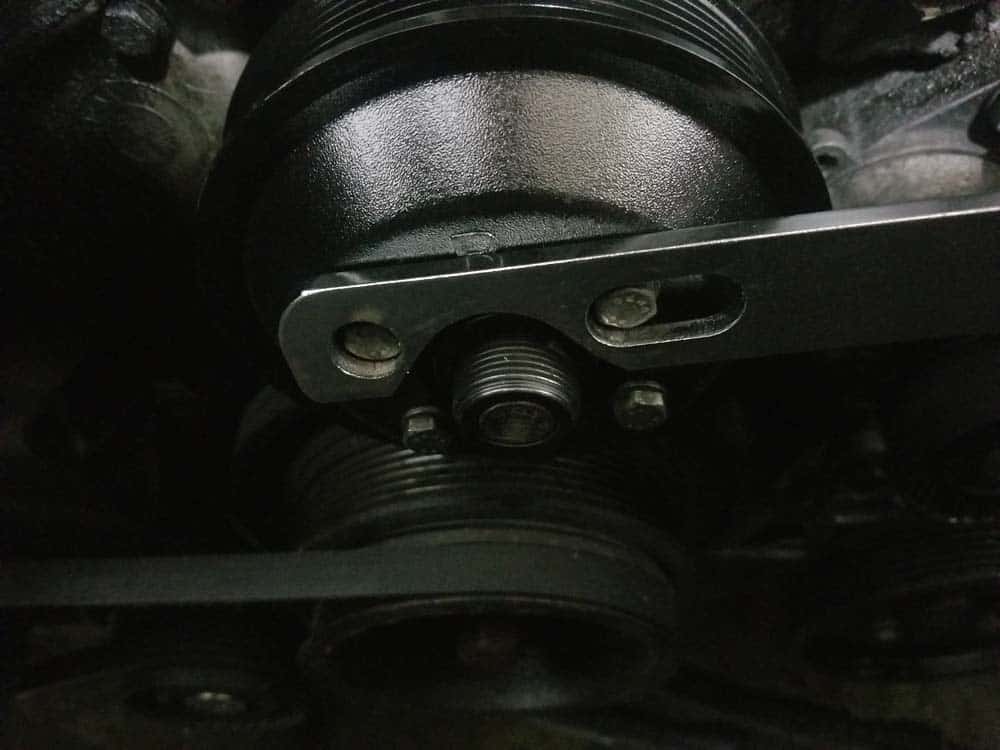
- The nut is a reverse thread...this means y'all must turn the nut CLOCKWISE to remove it.
- If you tin loosen the nut, and then spin the fan clutch nut off of the pulley. If the nut is seized and cannot exist removed, then you will need to follow boosted steps beneath to remove the cooling fan blades. Either manner, proceed to the side by side step #14.
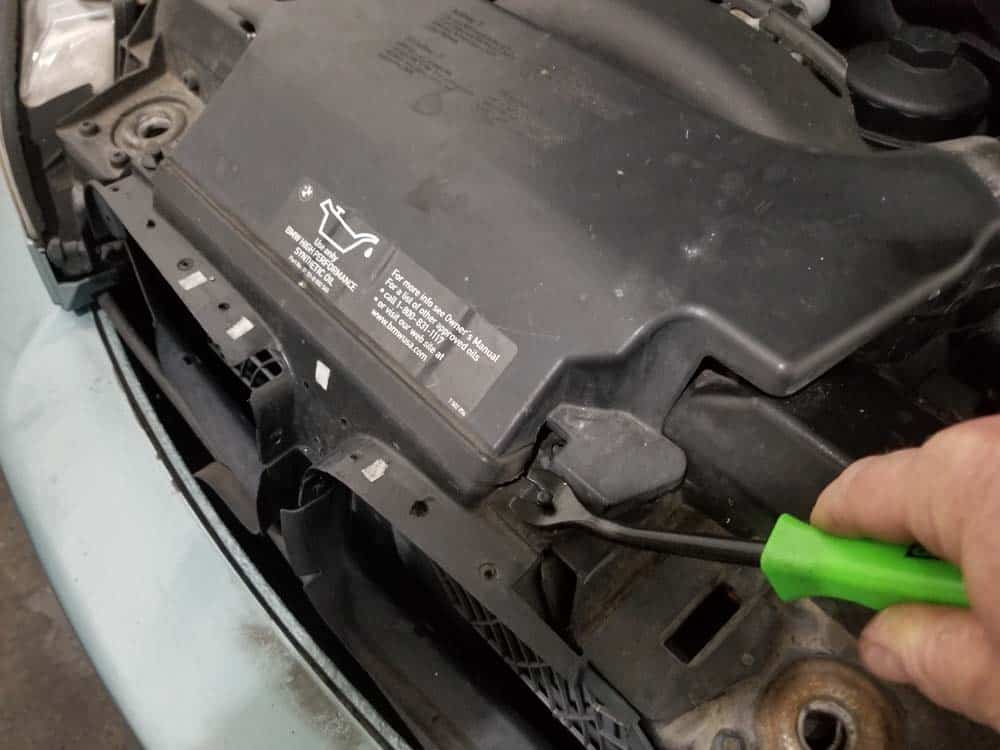
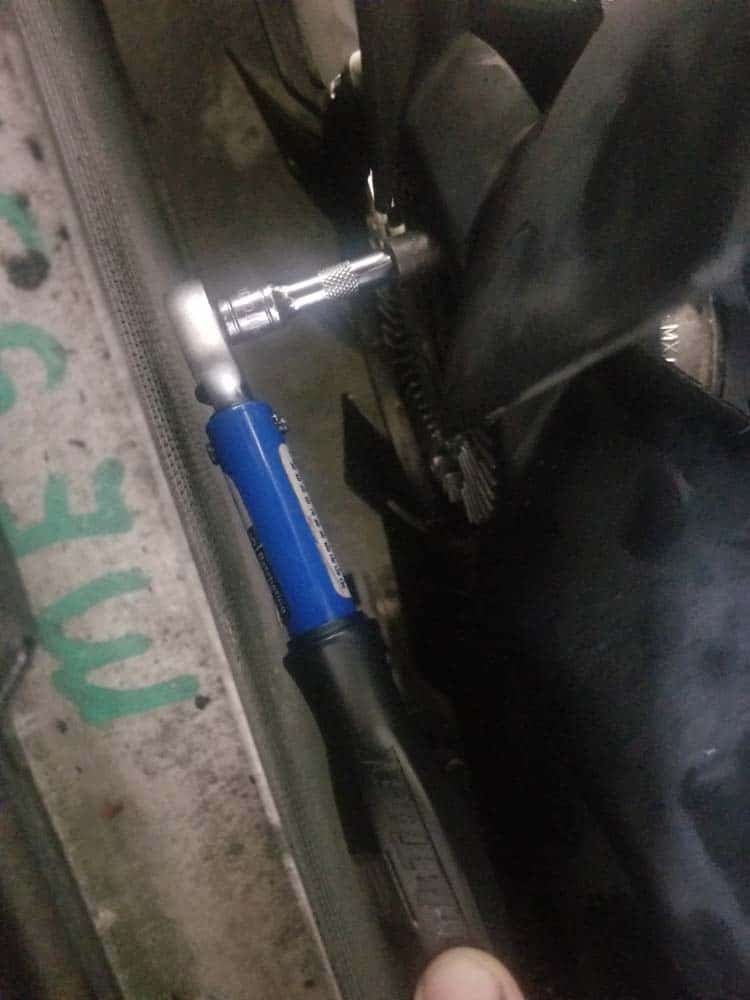
- Remove the right T27 torx radiator ballast screw. This spiral also anchors the fan shroud to the radiator. The left side of the fan shroud is anchored to the radiator with a plastic rivet. Remove the rivet with a trim removal tool.
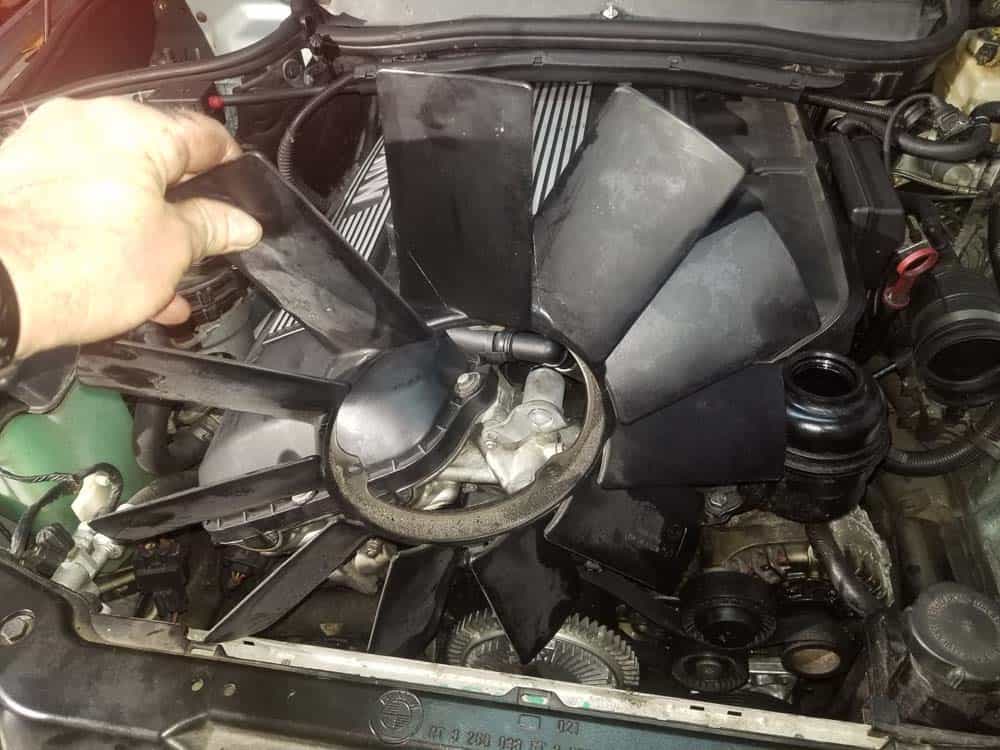
- If you were able to remove the fan clutch from the water pump pulley, grasp the shroud and the cooling fan and slowly remove them from the engine compartment togetherand go along to Department 3 below. If the nut was seized and y'all could not remove the fan, proceed to the adjacent footstep #16.
- If the clutch nut is frozen and you could non loosen it, slowly pull the shroud up and out of the front of the vehicle around the cooling fan. Don't pull on it if it gets hung up...you may have to get under the front of the machine to help guide it behind the fan blades. Take your time and practice your best to become it out with minimal damage to the shroud.

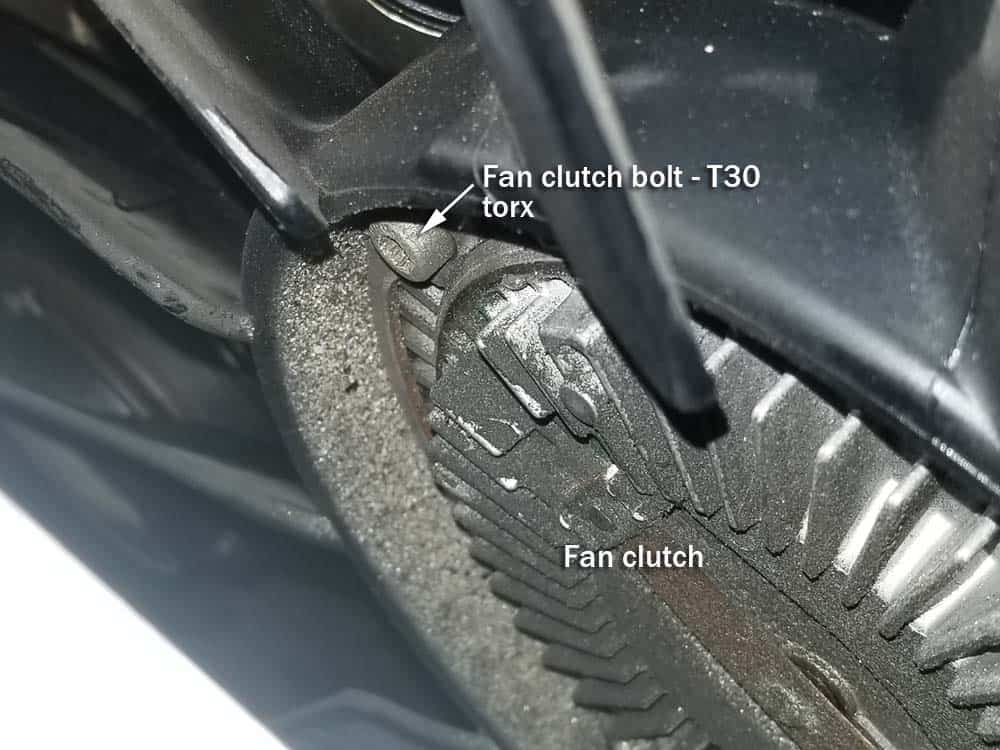
- Use a T30 torx chip to remove the three fan clutch mounting bolts. Remove the cooling fan from the vehicle.
Section 3 - Removing the BMW E46 Radiator from the Vehicle
- Locate the lower coolant hose attached to the rear of the expansion tank. Use a metal pick to release the locking clip on the end of the hose. Pull the hose loose from the expansion tank.
- Remove the coolant expansion tank by releasing the locking clench on the bottom of the tank. The locking clench is located on the lesser correct side of the tank. To release the clamp, simply reach your hand down and slide information technology out.
- Take hold of the top of the expansion tank with two hands and endeavour to pull it free from the radiator. You may accept to gently rock information technology back and along to get information technology to release. Older tanks may exist particularly stubborn and require a couple of small taps with a screwdriver on the bottom to become them to release.

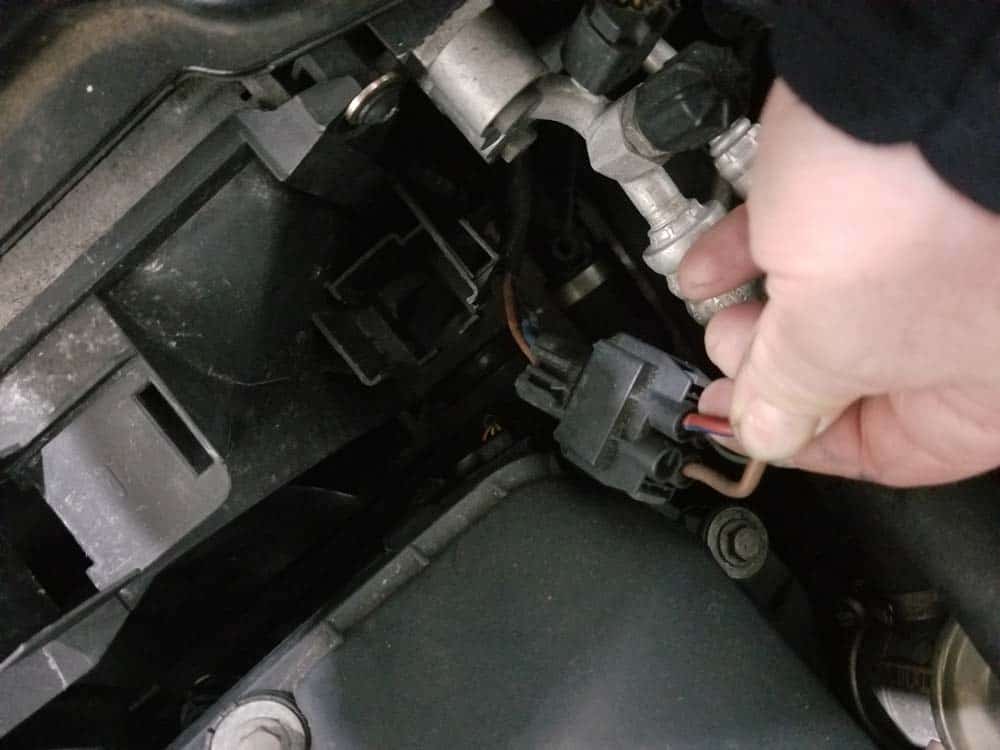
- When the expansion tank is loose, flip it over and disconnect the level sensor.
- Use a T27 torx fleck to remove the left radiator mounting screw.
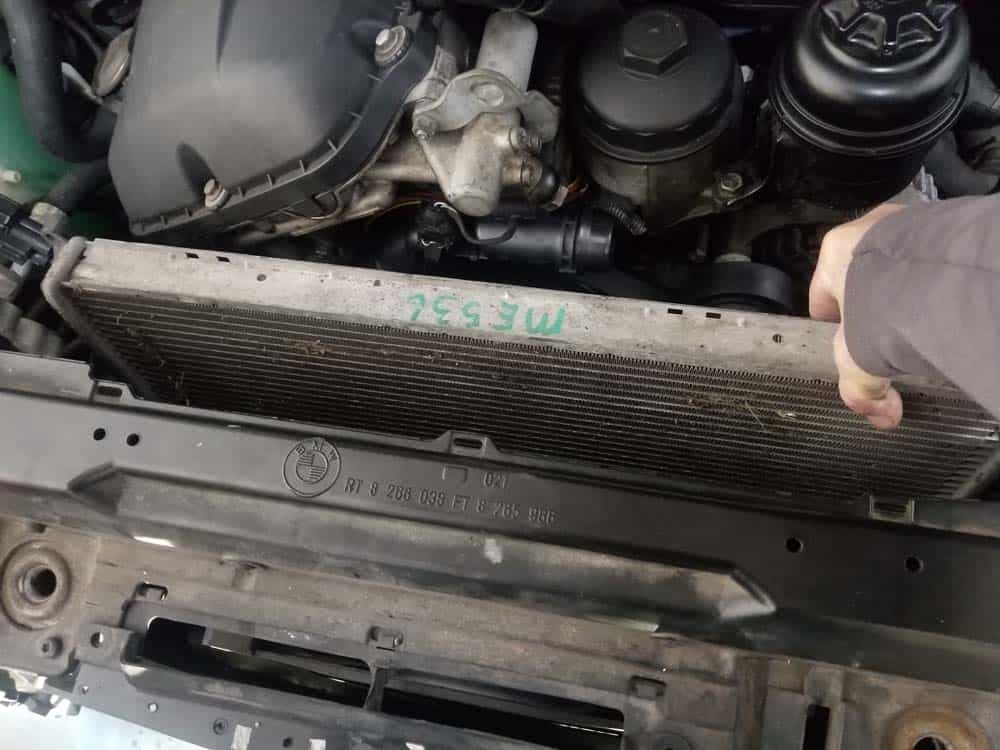
- The radiator tin now be removed. Tilt the radiator back, so pull it up and out of the engine compartment.
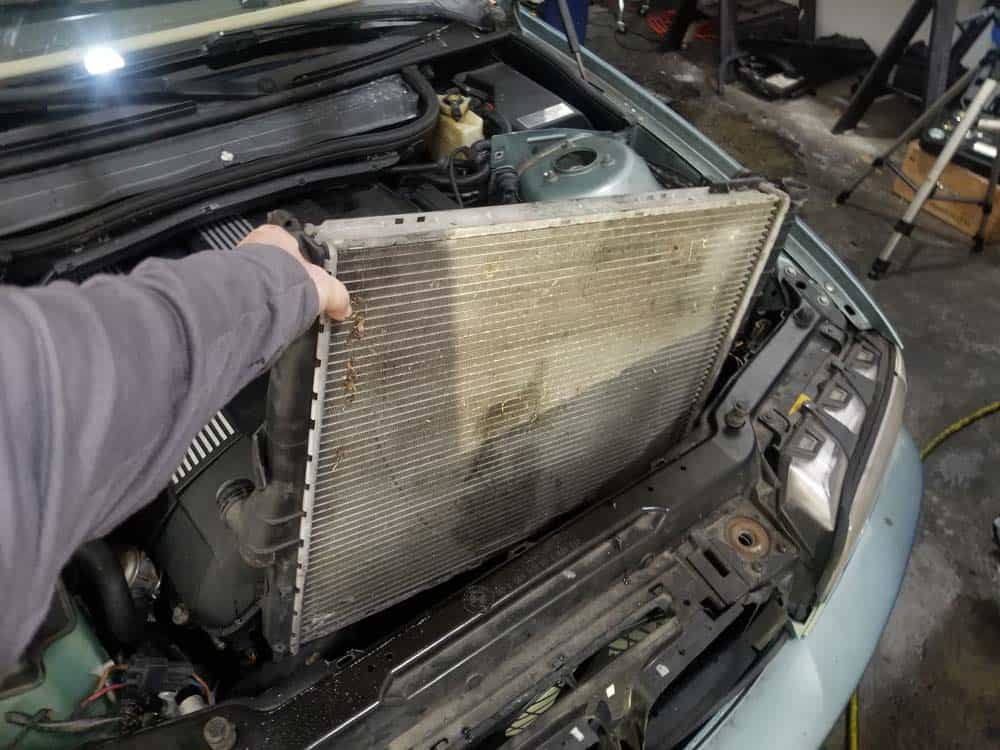
- Lay the old radiator down on a work bench.
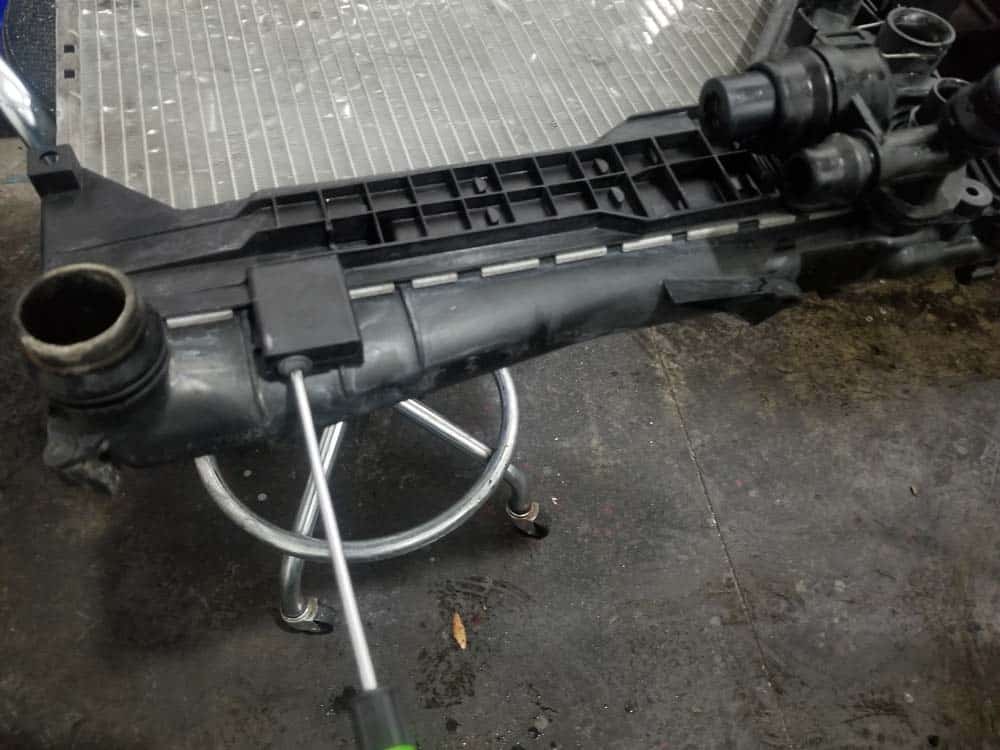
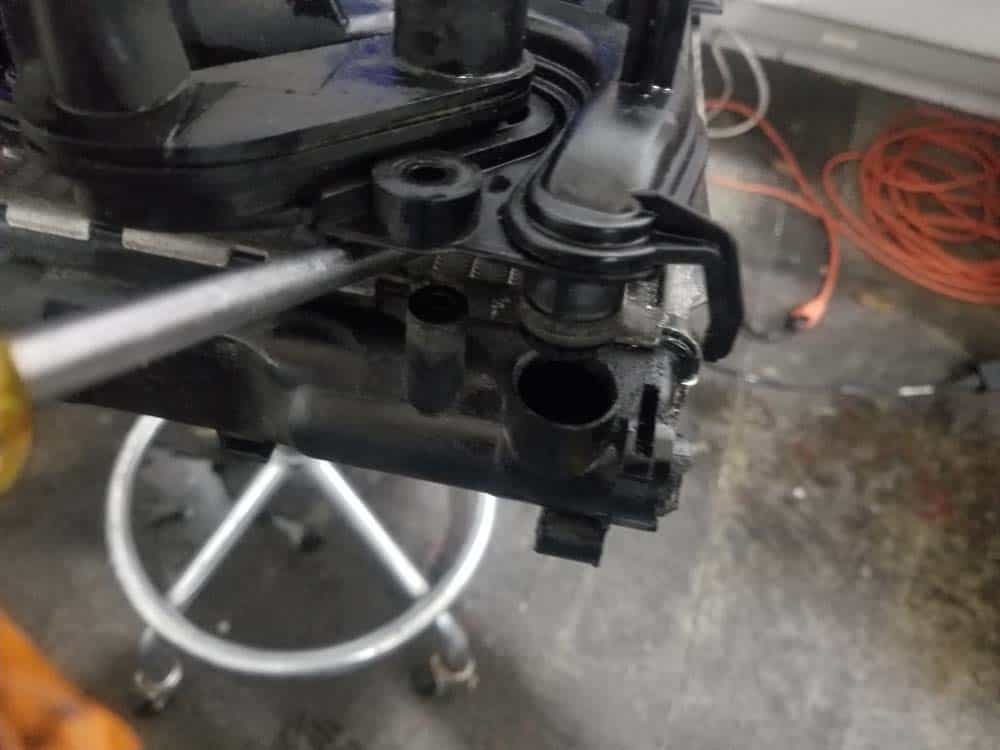
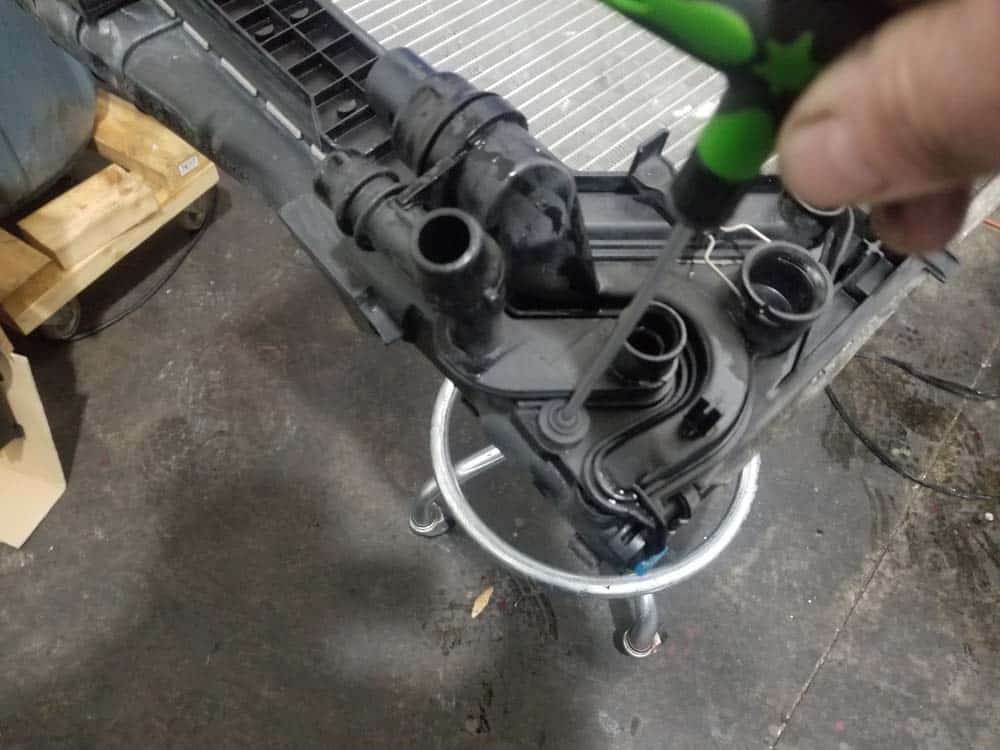
- If yous are going to reuse the old expansion tank mounting plate, remove the two T27 torx screws anchoring it to the radiator. Use a large flat bract screwdriver to gently pry it off of the radiator fitting. Remove the mounting plate from the radiator.
Section 4 - Installing the new BMW E46 Radiator
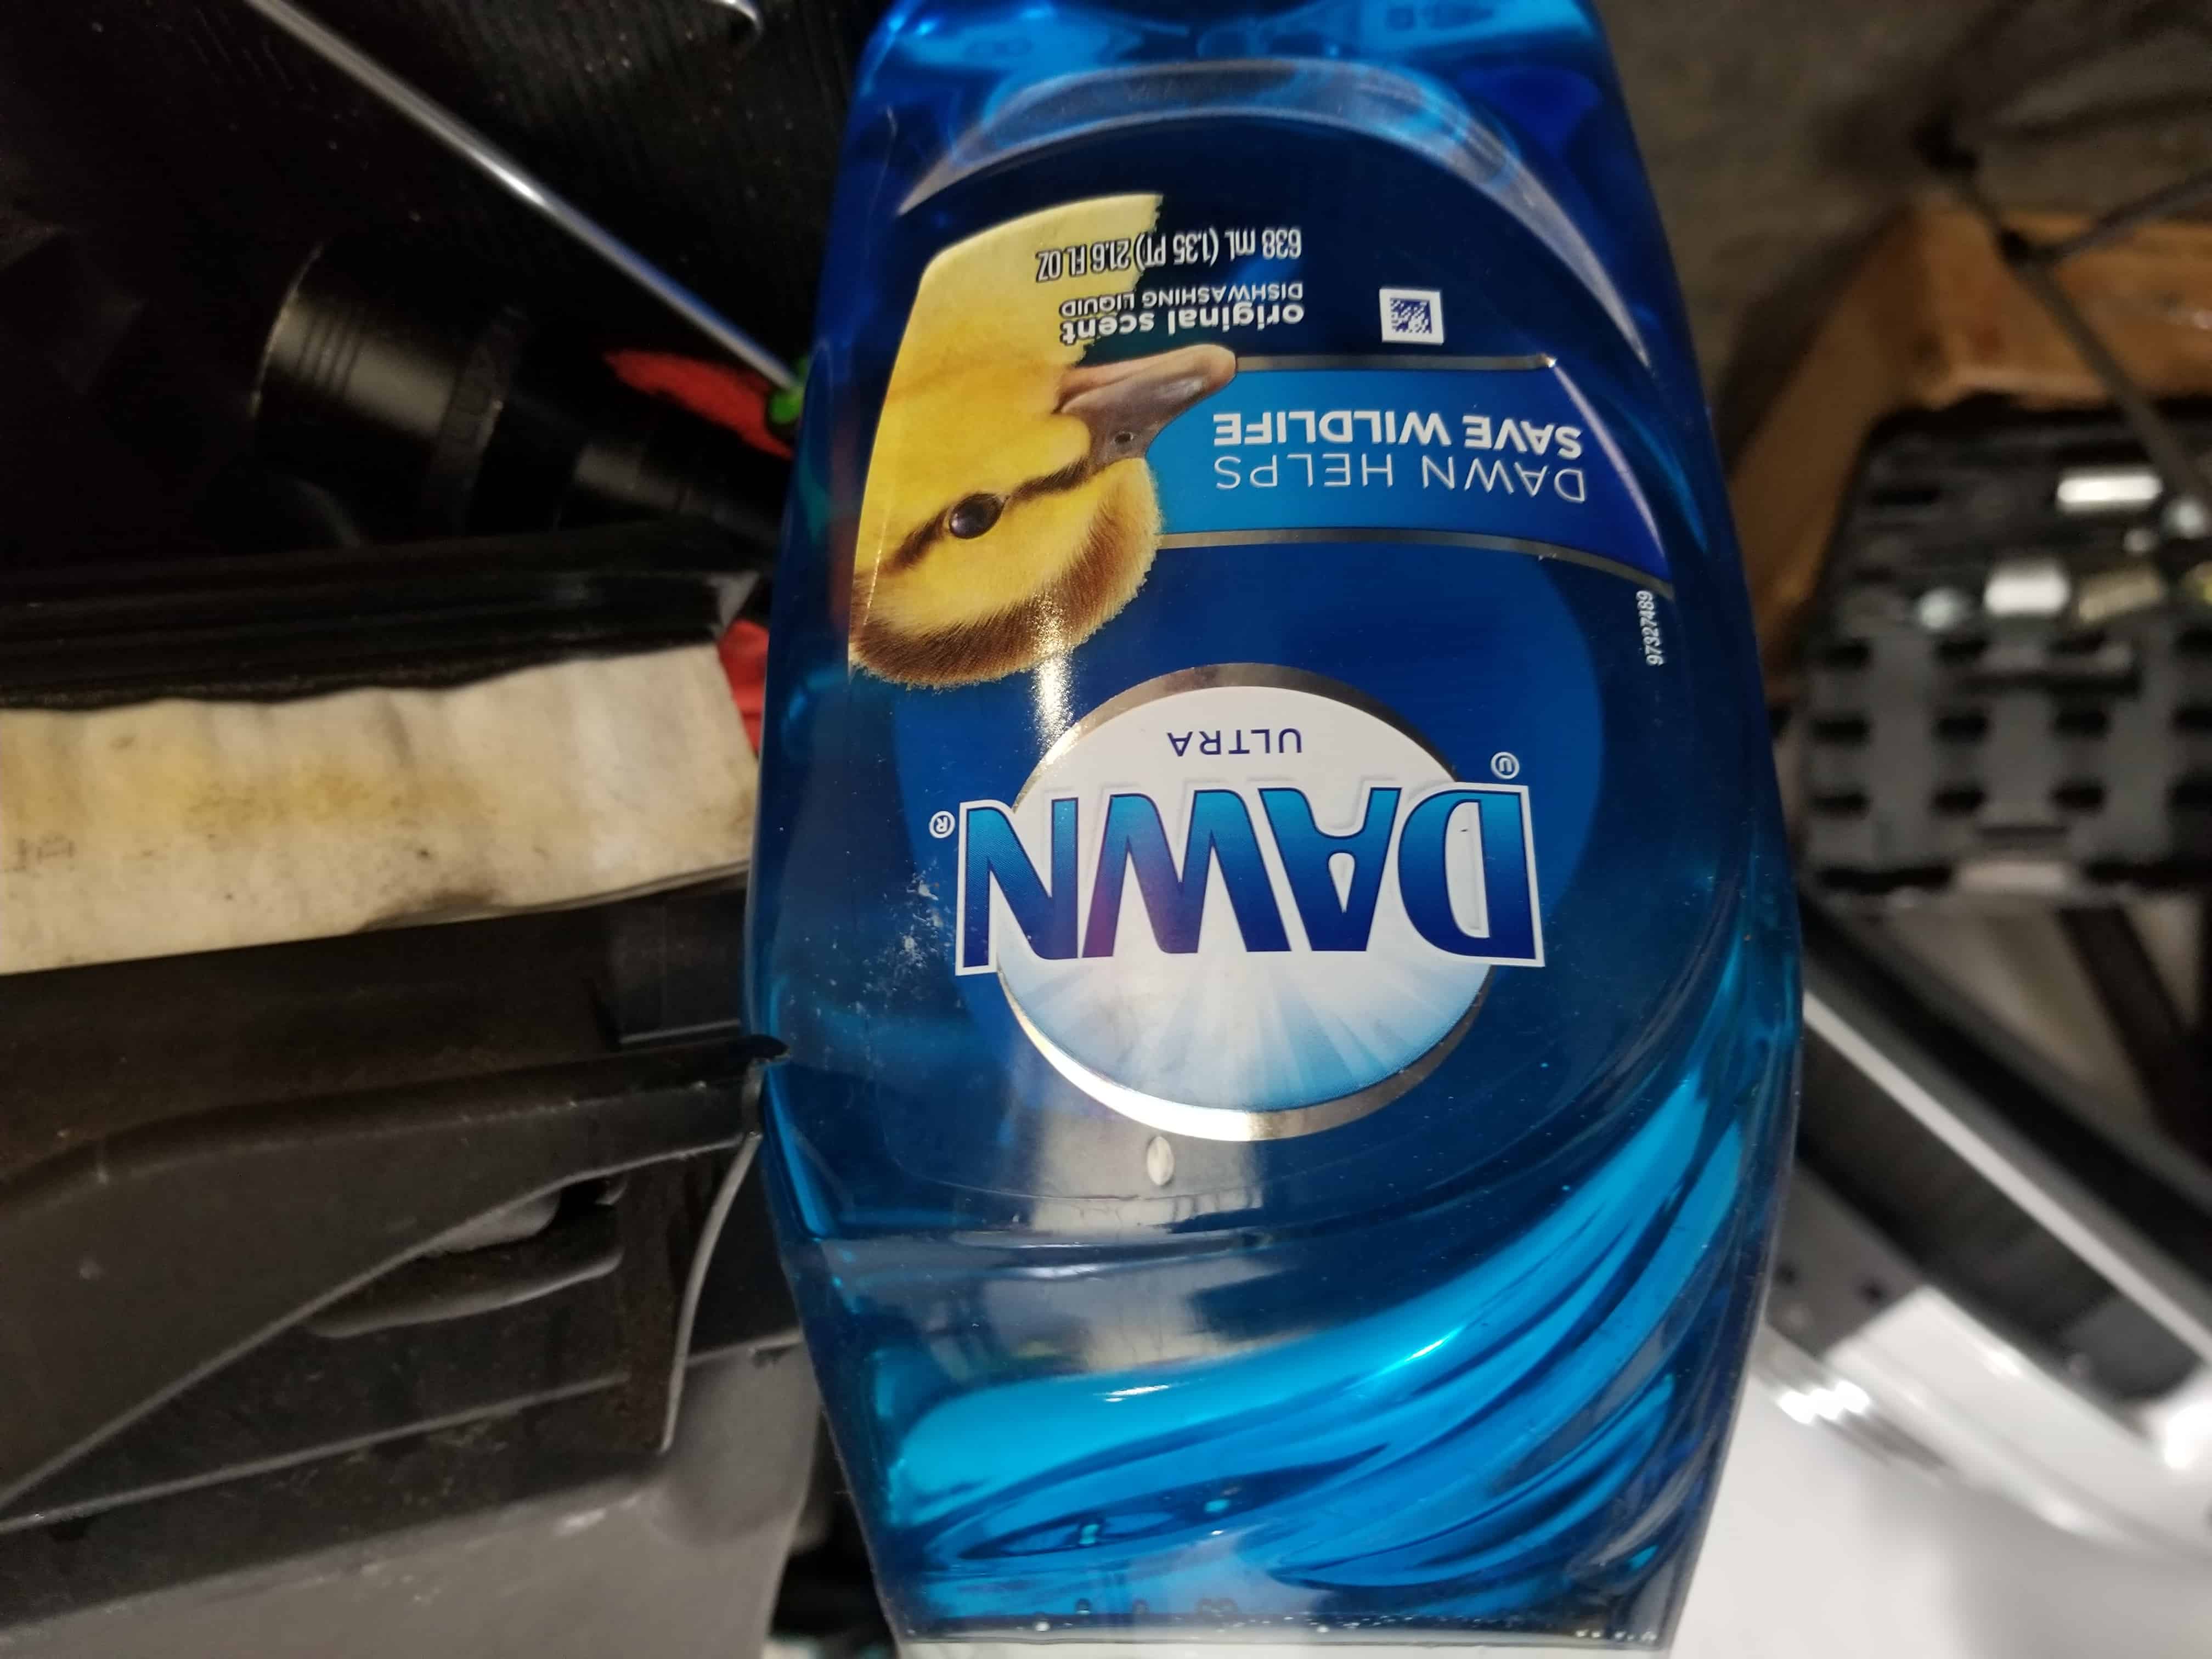
Installing the new radiator is very straightforward - it is basically post-obit the above instructions in reverse. One problem many mechanics come across is reinstalling the coolant hoses. If yous are having problems reinstalling the coolant hoses and getting them to lock into position, utilise some liquid dish detergent to the fittings. This volition help the hoses slide on without whatever issues. NEVER apply a petroleum based oil or grease on the hose o-rings. This can cause leaks.
- Unpack the new radiator and lay it on the work bench. Double check to make sure you have the correct part number.
- Some radiators (like ours beneath) come with the new drain plug already installed. If your radiator was shipped without the bleed plug installed...install it now.
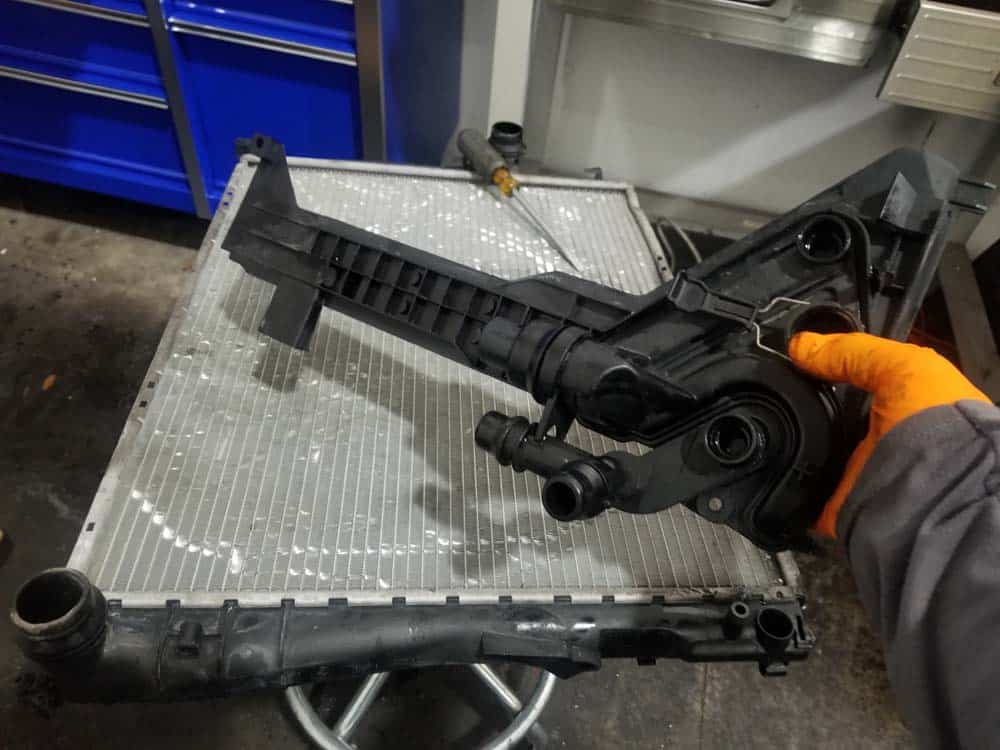
- Install the expansion tank mounting plate on the new radiator, applying pressure with the palm of your hand to insure a tight connection. Reinstall the two torx screws.

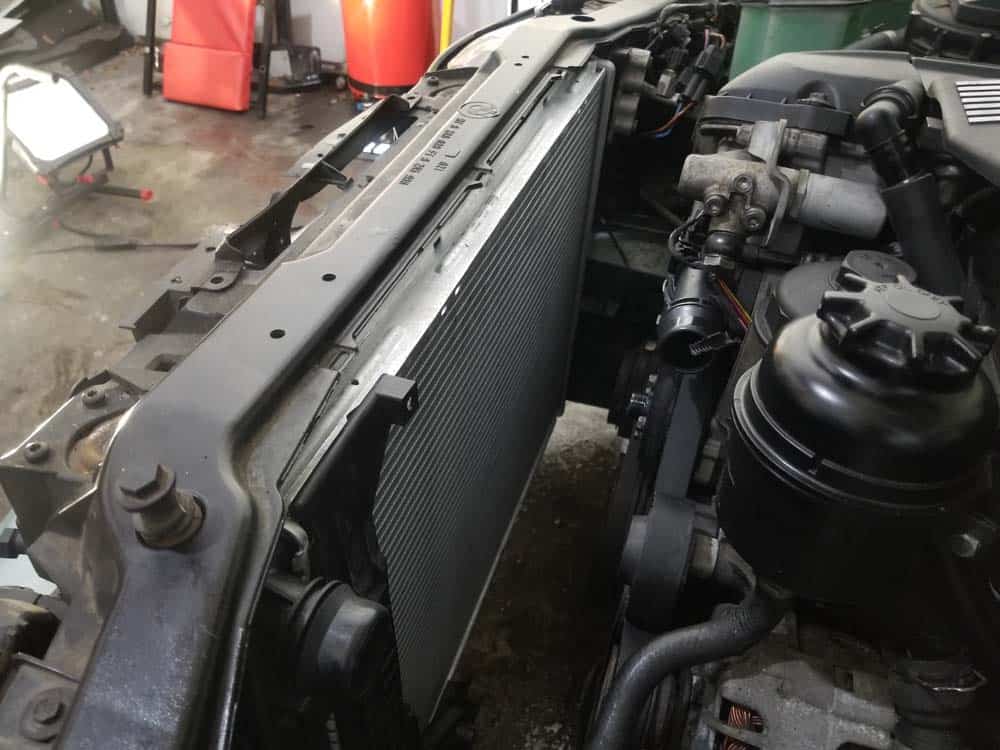
- Install the new radiator into the car. Reinstall the left and right T27 mounting screws to concord the radiator in place.
- Visually locate the two fittings on the expansion tank mounting plate that the tank connects to.
- Slowly lower the new expansion tank onto the mounting plate fittings. Notation that the tab on the dorsum of the tank should fit into the groove on the radiator.
- When y'all are confident the tank is positioned correctly, use the palm of your mitt to push the expansion tank firmly onto the expansion tank plate. Attain down the right side of the tank and push button the locking prune in.
- Reinstall the lower coolant hose dorsum onto the expansion tank. Always close the locking clamps BEFORE installing the coolant hoses on their fittings. You want to hear them "snap" into place when installed.
- If y'all had to remove your cooling fan from the clutch because of a seized nut, reinstall it using the three torx mounting bolts. Make sure you have the fan blades facing the correct management. Torque the mounting bolts to 10 Nm (7.five ft-lb).
- If you were able to remove your cooling fan using the fan clutch tool, liberally apply some multipurpose automotive grease to the clutch nut threads. This will prevent information technology from seizing up in the future and arrive like shooting fish in a barrel to remove for future repairs.
- Lower the fan shroud and the cooling fan together into the front of the vehicle. Spin the cooling fan onto the water pump counterclockwise to tighten. Utilise the special fan clutch tool to tighten the nut as snug as y'all can go information technology. Since information technology is a reverse thread, it is self tightening then y'all practice not have to worry about torquing it.
- Remove the correct radiator mounting screw (information technology was installed earlier to hold the radiator in position). Movement the fan shroud into its correct position so reinstall the spiral so it anchors the shroud and the radiator to the frame. Reinstall the plastic shroud rivet.
- Reinstall the upper radiator hose that runs from the thermostat to the expansion tank. Utilise the palm of your hand to put pressure on the hose then it properly clicks into identify on the expansion tank. If the hose is being obstinate and won't click onto the fittings, utilise some liquid dish detergent to lubricate the connexion. Once again...e'er close the metal clamp before installing a coolant hose on its fitting(s). We cannot stress this plenty. Information technology is very of import to hear the "click" when reinstalling coolant hoses.
- Motility nether the vehicle and reconnect lower left radiator coolant hose. The lower left hose can often exist more than hard to install than it was to remove. If you can't get information technology to snap on its fitting, endeavour applying a petty liquid dish detergent to the o-ring to help it slide onto the fitting. NEVER Use a petroleum based lubricant similar grease or oil to lubricate the o-ring.
- Audit the transmission cooler - make certain the two o-rings are intact on the inlet ports. Reinstall the transmission cooler. Utilize the palm of your hand to apply pressure to brand sure the cooler o-rings seat properly in the radiator. Close the metallic clench past lowering the plastic pull.
- Reinstall the lower right radiator hose. Again, this hose can exist as difficult to install as information technology was to remove. Use dish detergent to lubricate the o-ring so it slides on.
- Double and triple check all of the hose connections to brand sure you didn't over look anything. Also check to make sure the drain plug is snugly installed. If everything looks secure, proceed to the next section.
- Reinstall the air quality sensor and the wiring harness connector into the fan shroud.
- Reinstall the intake tube, intake muffler and reconnect the MAF sensor.
Section v - Refilling the BMW E46 Radiator with Coolant, Bleeding and Testing
Refilling and bleeding the coolant system in your BMW E46 3 serial car is a very simple procedure. The goal is to remove any air bubbles trapped in the coolant line that could potentially cause the engine to overheat. Different many other repair articles, the BMW Repair Guide uses the "double bleed" approach on their BMW E46 3 series cars. This is a proven method that we have used for years with 100% success. The double bleed method entails purging the air out of the coolant system twice; once with the engine off, so again with the engine running. We have institute this to exist the most complete method of removing all of the air out of the E46 cooling system.
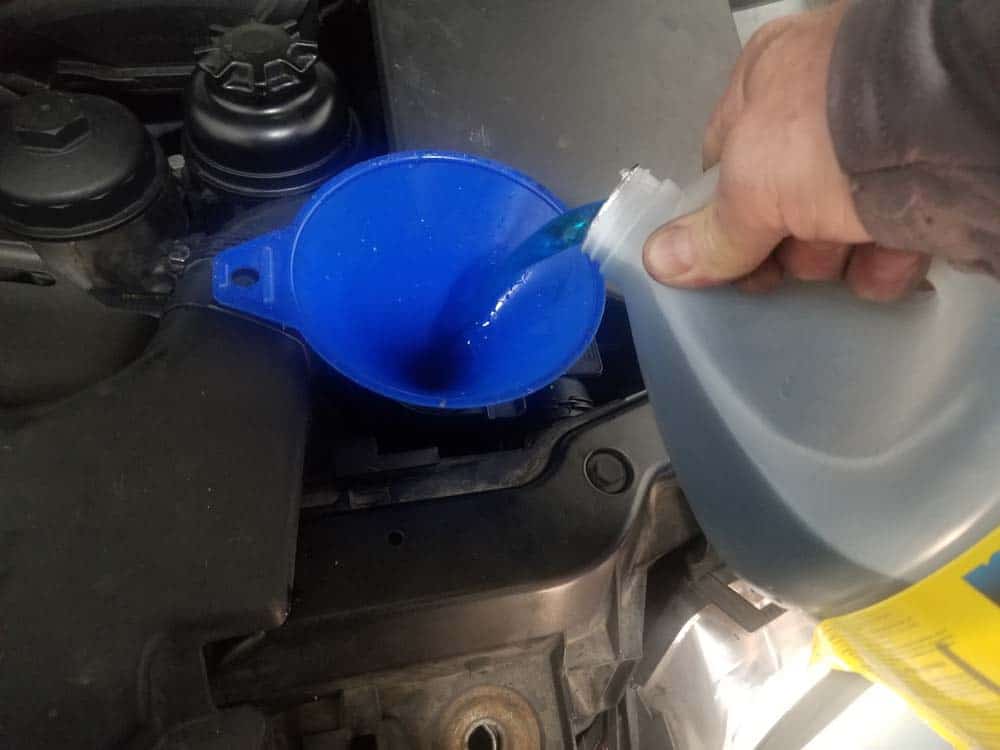
- Only use Genuine BMW Antifreeze/Coolant mixed 50/50 with distilled water in your vehicle. Using any other make of antifreeze/coolant in your BMW is strongly discouraged.Genuine BMW Antifreeze/Coolant was specifically engineered for your BMW...other brands may not cool your engine correctly.
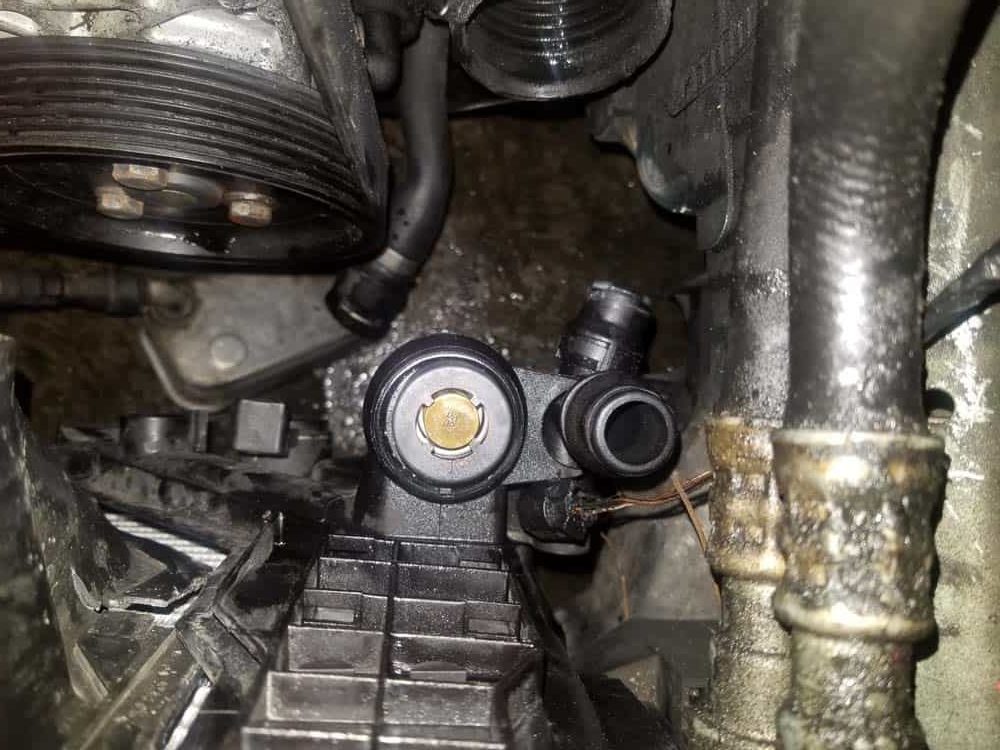
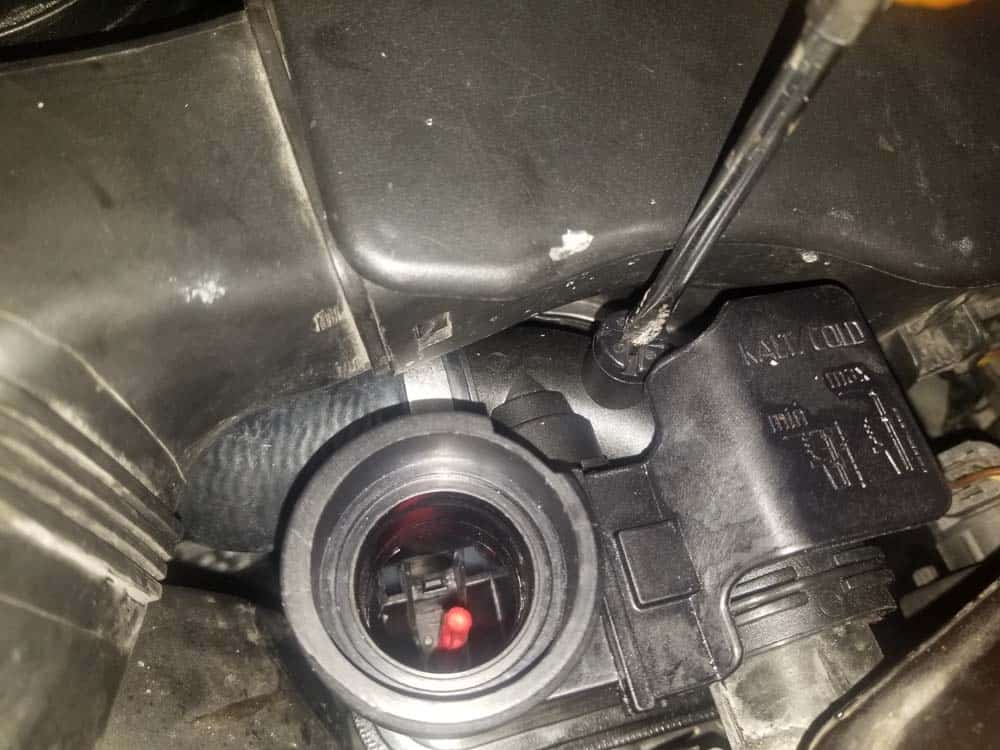
- Loosen the bleed screw on the upper coolant hose.
- Turn the ignition on. Exercise not start the vehicle.

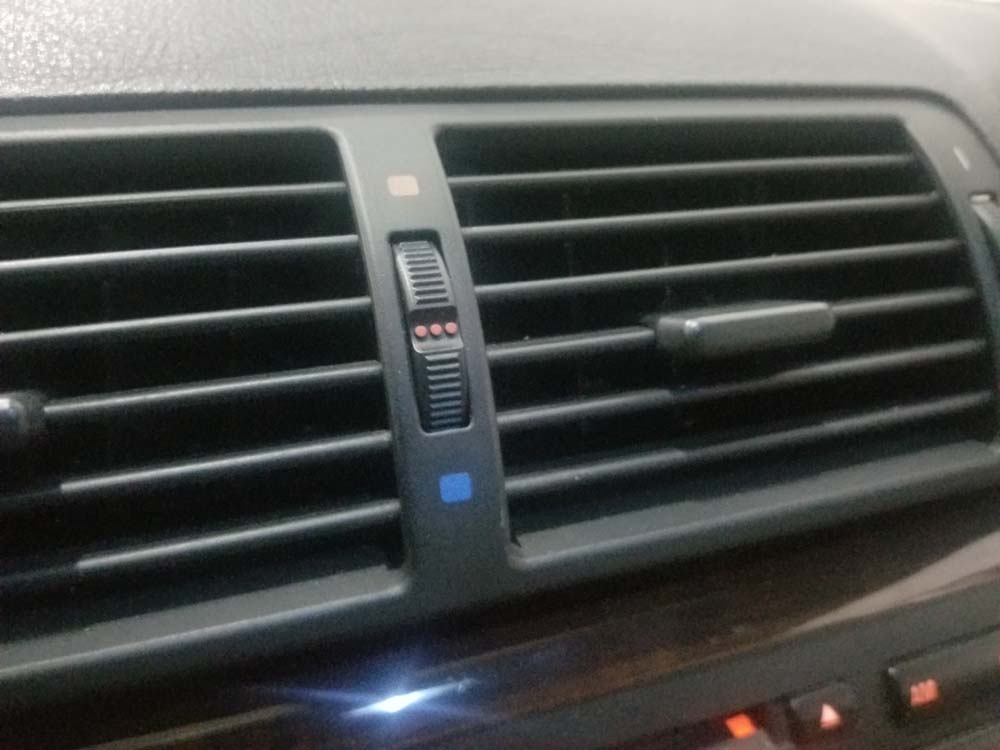
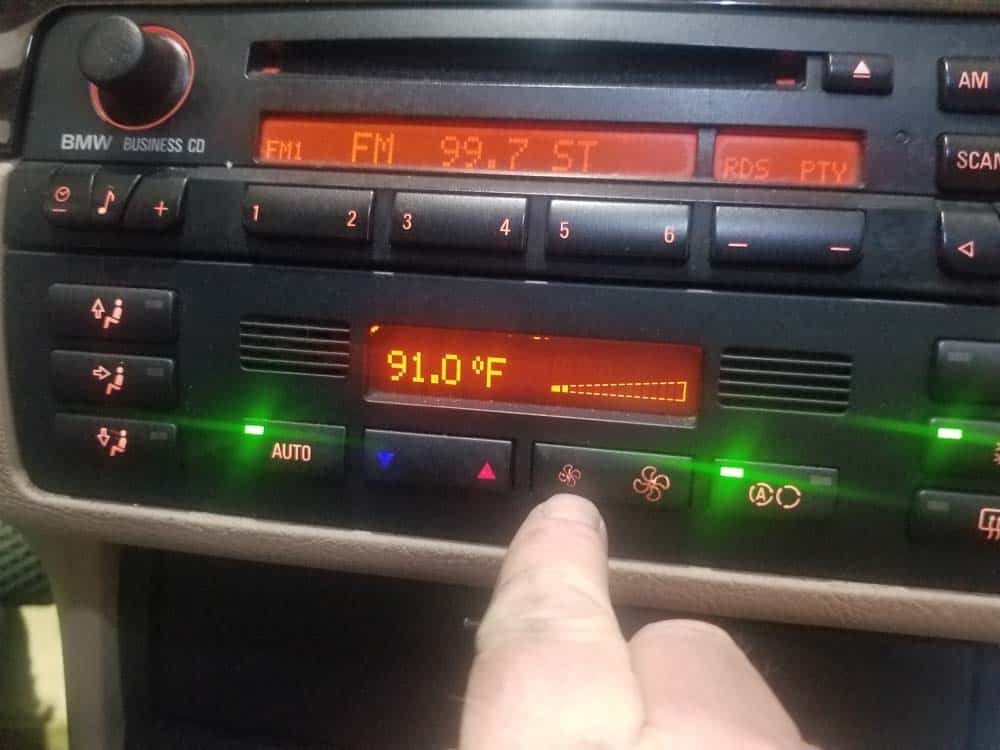
- Fix the HVAC temperature controls to full warm and the fan speed to its lowest setting (this opens the heater core and activates the secondary electrical coolant pump).
- Slowly make full the expansion tank with coolant until it starts to spill from the bleeder screw.
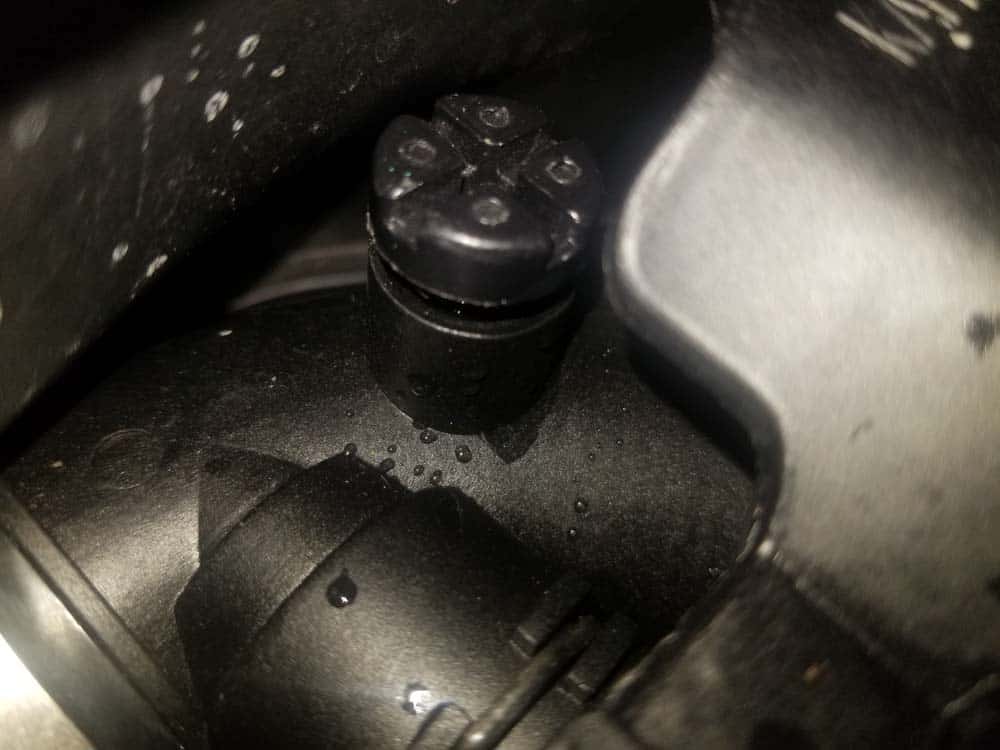
- When the coolant spilling from the bleed screw is free of air bubbles (just a steady stream of coolant), tighten the screw and supervene upon the expansion tank cap.
- Starting time the engine.
- With the engine running, loosen the bleeder screw over again. Yous should become more air bubbles coming out until there is a steady stream of coolant existence pushed out of the bleeder hole. Tighten the bleeder spiral.
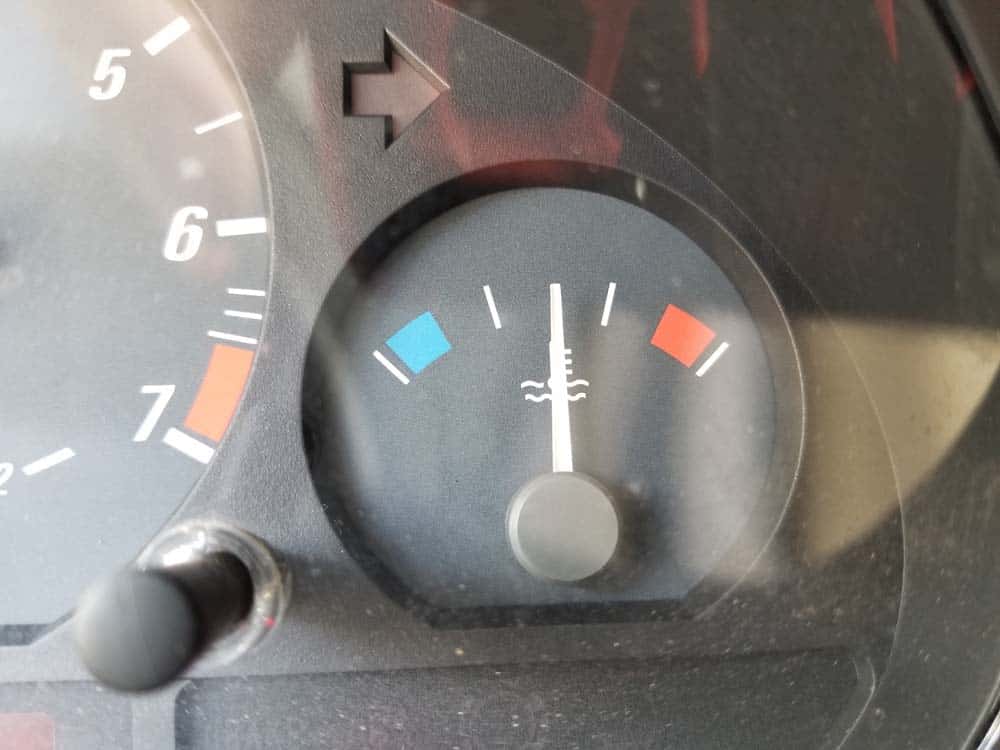
- Allow engine to accomplish operating temperature (about v minutes if common cold). Continue an eye on the engine temperature gauge...the needle should stay right in the heart. Check all of the hoses for leaks.
- Let the engine to cool down. Recheck the coolant level in the expansion tank and superlative off if necessary.
BMW E46 Radiator Replacement Finished
Source: https://bmwrepairguide.com/bmw-e46-radiator-repair-1998-2006-3-series-all-models/
Post a Comment for "what does the upper radiator hose connect to bmw e60"